
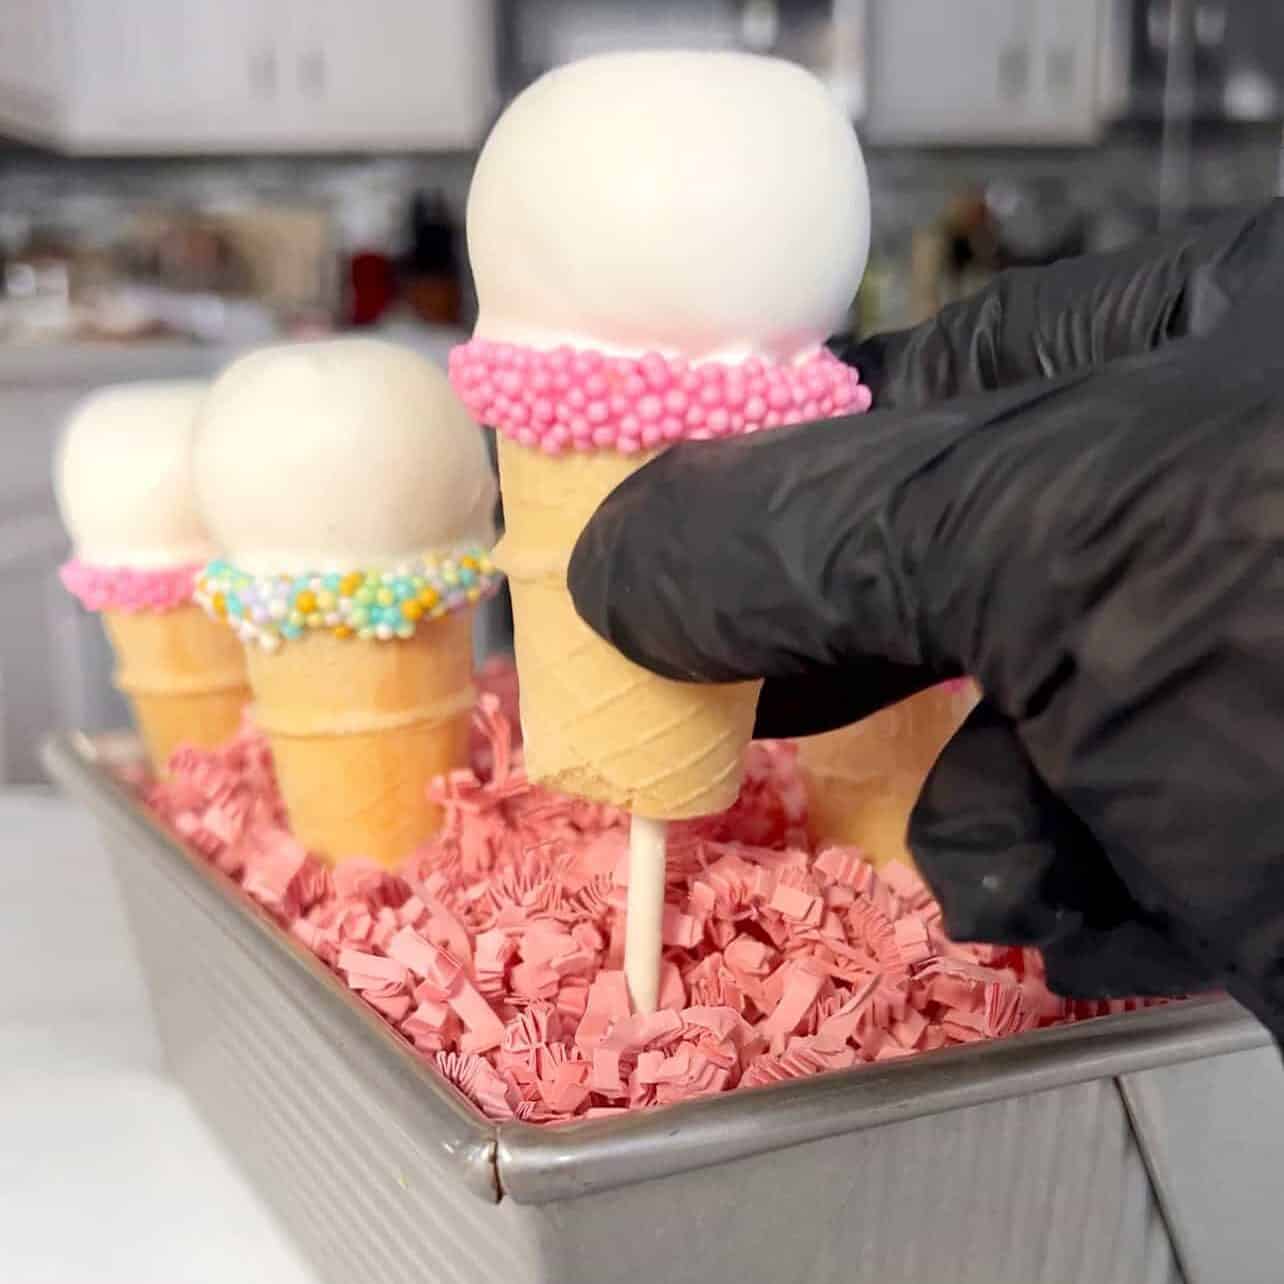
Who realized just now they need “Ice Cream” Cake Pops in their life? I mean, look how cute they are! I'll wait - Scroll down to the first picture. Classic cake pops nestled in mini ice cream cones, dipped in vibrant candy melts or rich melted chocolate, then topped with festive sprinkles for extra flair. People will undoubtably squeal seeing these endearing sweet treats! Customize them to fit any theme or celebration - Valentine’s Day, Easter, baby showers, birthdays, gender reveals, and more. Fun, delicious, and oh-so-adorable. Get ready to steal the show.

If you've made classic cake pops, then these "Ice Cream" Cake pops will be a breeze to make. We followed the same exact process of making my Starbucks Copycat Birthday Cake Pops or Starbucks Copycat Chocolate Cake Pops, then simply insert them into decorated mini ice cream cones. The final touch - add that classic "ice cream" drip on top, a few extra sprinkles, and voila - you have yourself the most satisfying moist cake pop in the shape of an ice cream cone!

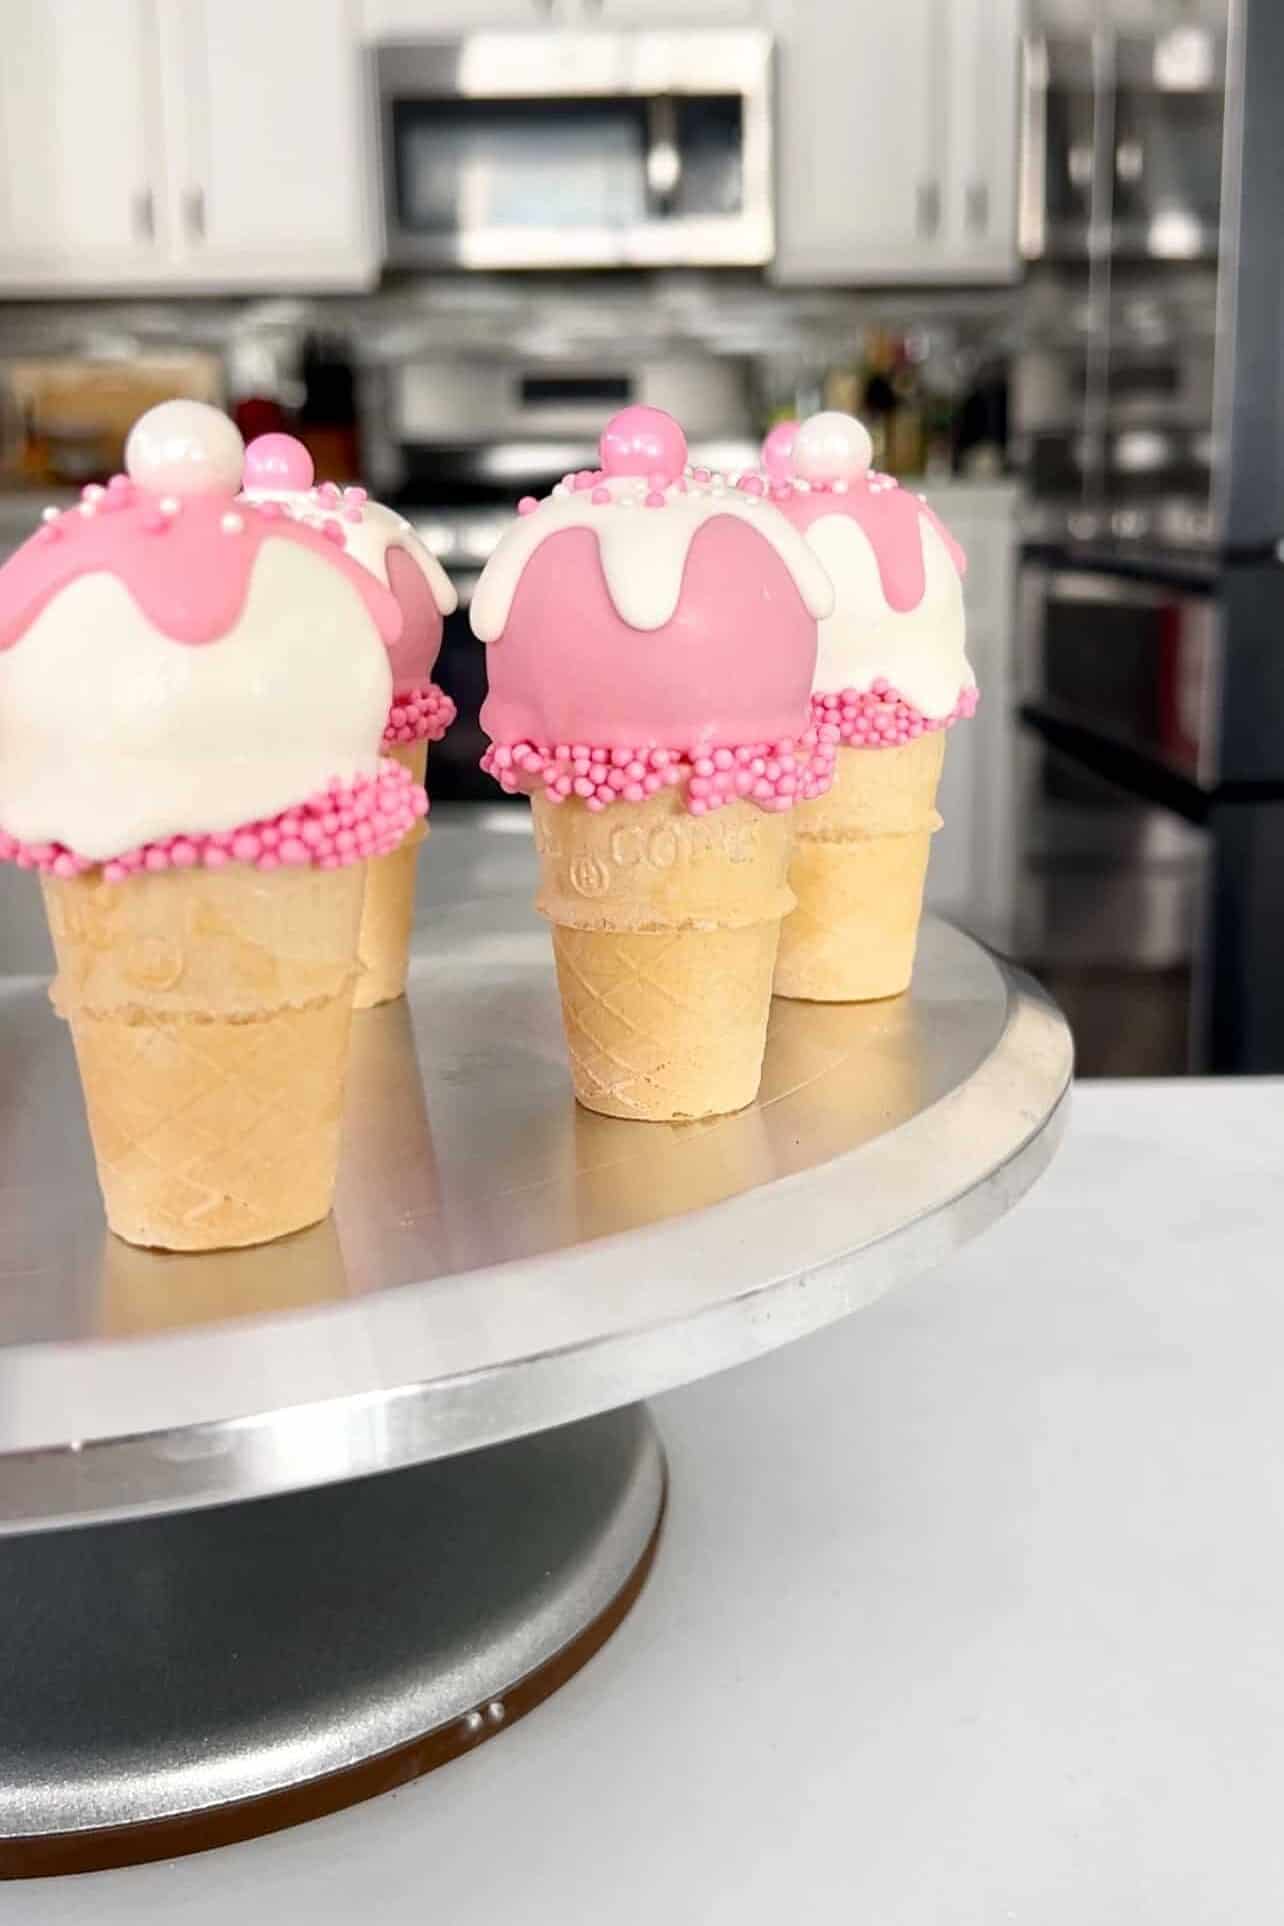
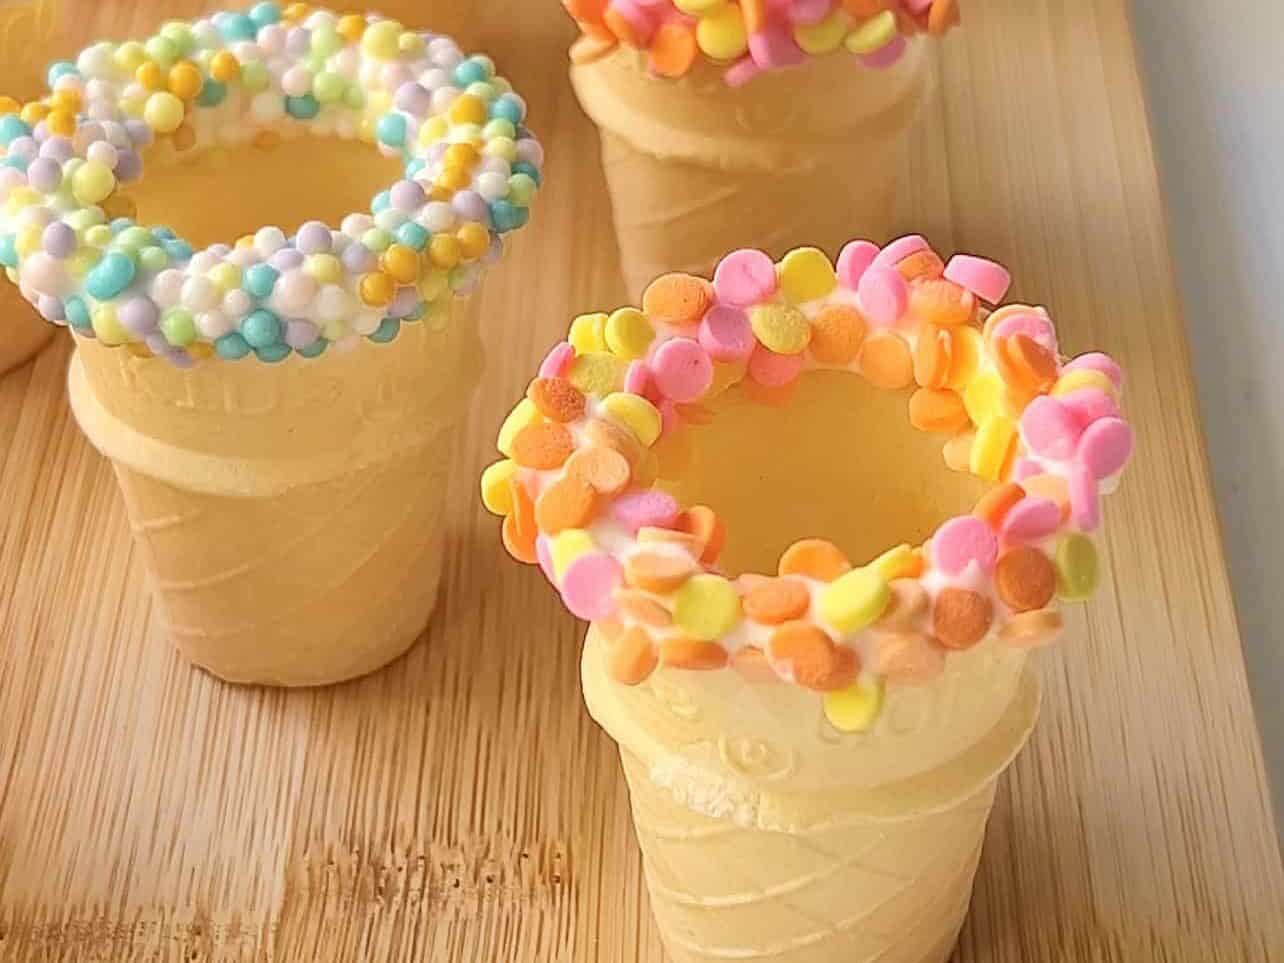
The sky is the limit as far as decorating possiblities, am I right? I usually stroll through my local arts & craft store and see so many adorable sprinkles I want to use. Trust me - now I need a big container to store them all! You can make these delicate pink ones for Valentine's Day, Galentine's Day, or girl baby showers.
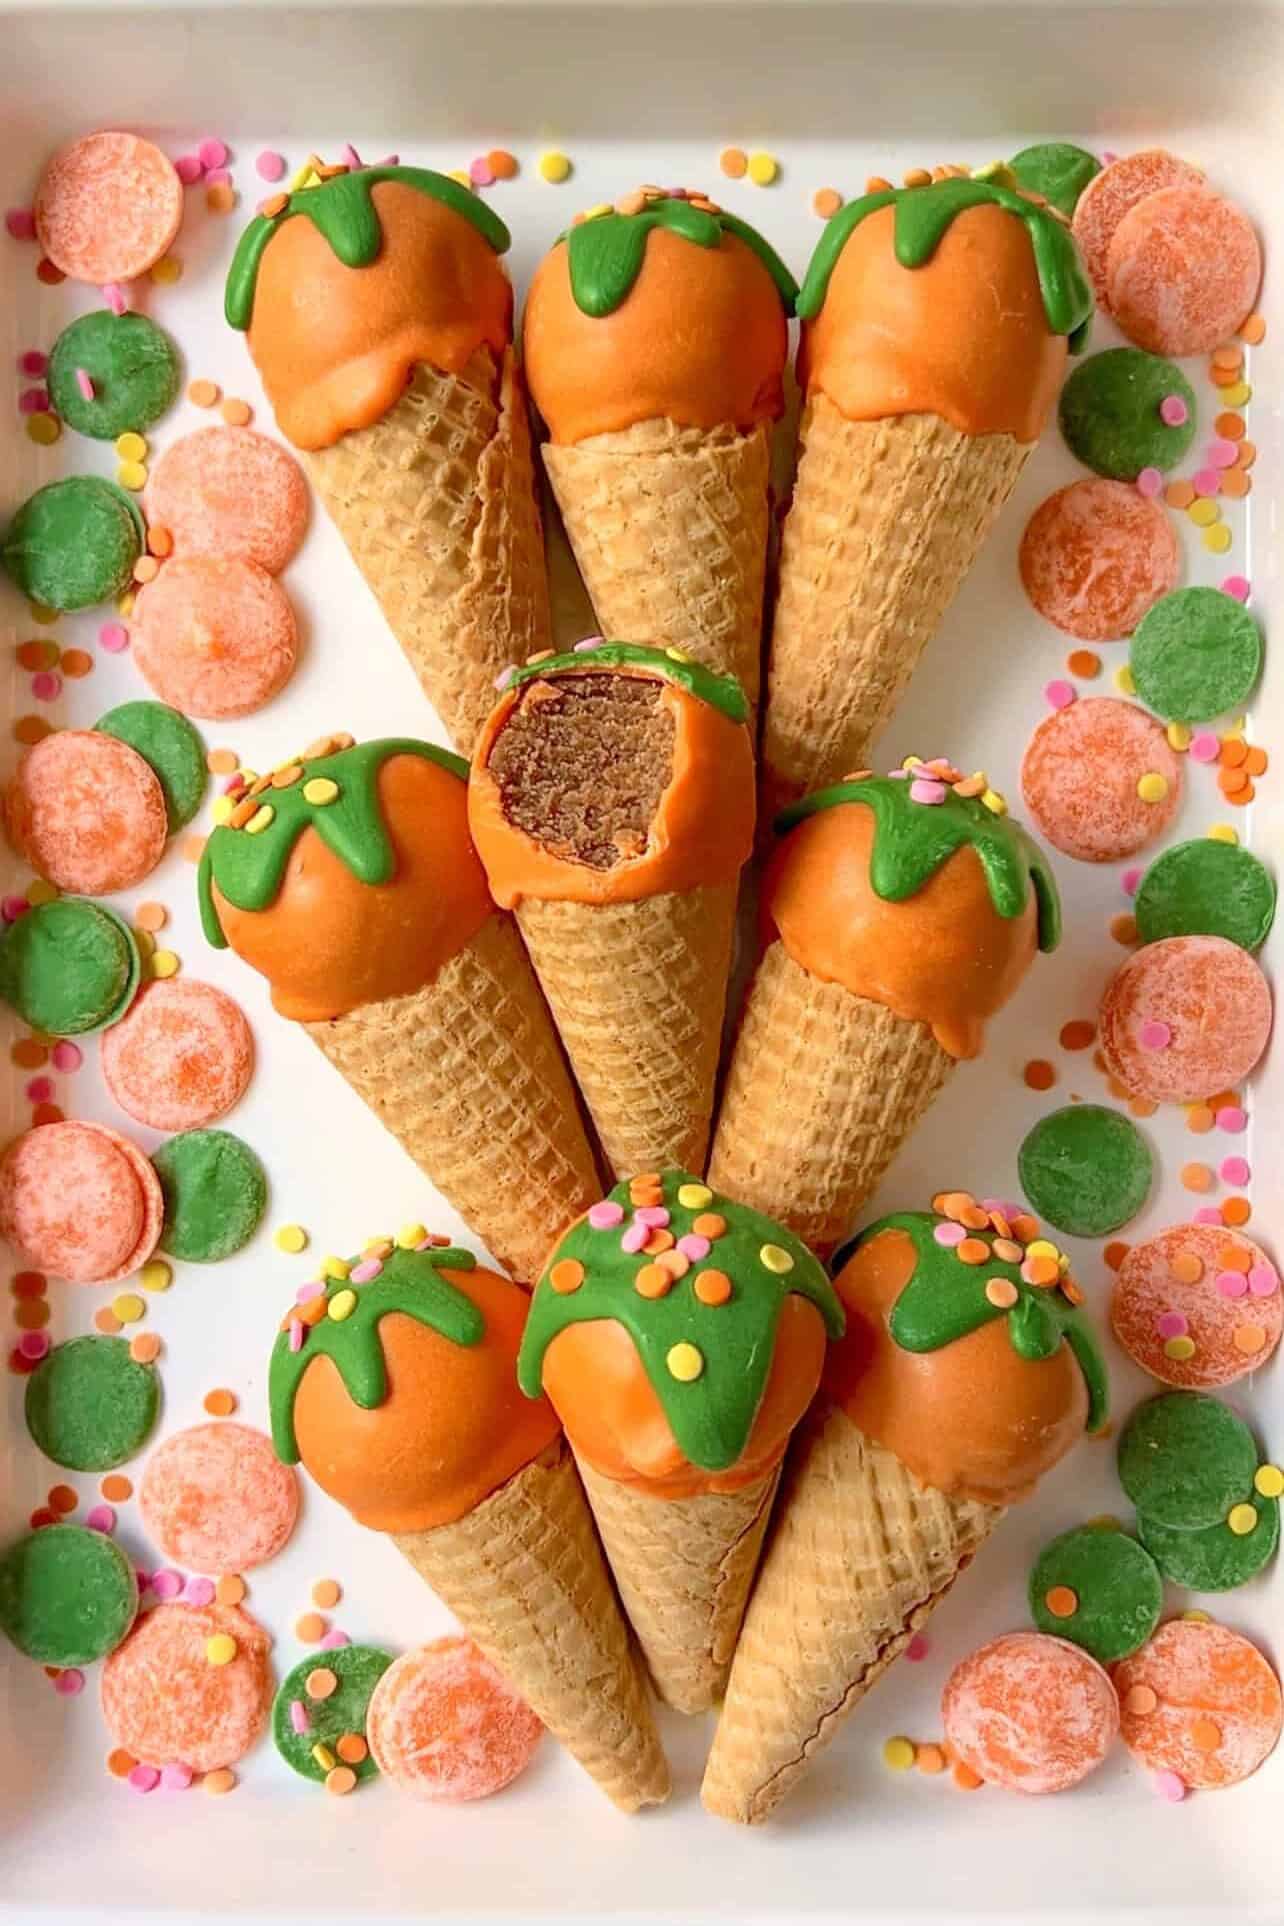
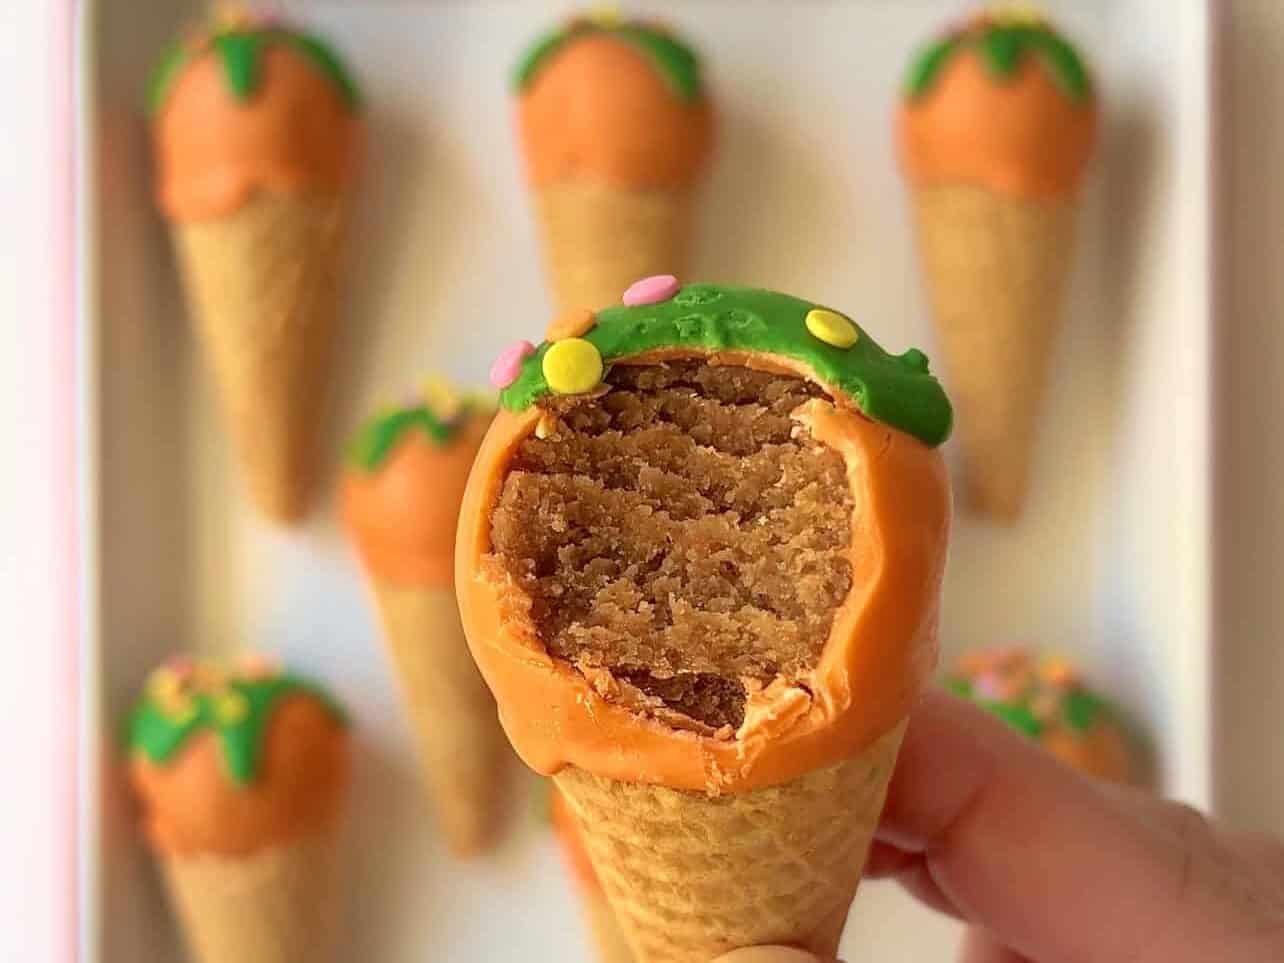
The beauty of cake pops in general is you can use ANY FLAVOR store-bought cake box mix. Other than the buttercream and choice of decorations, the recipe is exactly the same. For these, I baked and rolled carrot cake pops, dipped them in orange candy melts, added green "ice cream dip" to mimic leafy carrot tops, and finished it off with pastel sprinkles. If I saw my friends serving this for Easter, I would GASP.
This idea was inspired when one of my loyal followers, Carolina Regalado, told me she needed some help making ice cream cake pops for her daughter's birthday. I was like "Ice cream cake pops? What?!" She showed me a Tiktok video by Monica Costello and after watching it, I knew immediately I had to try recreate it.
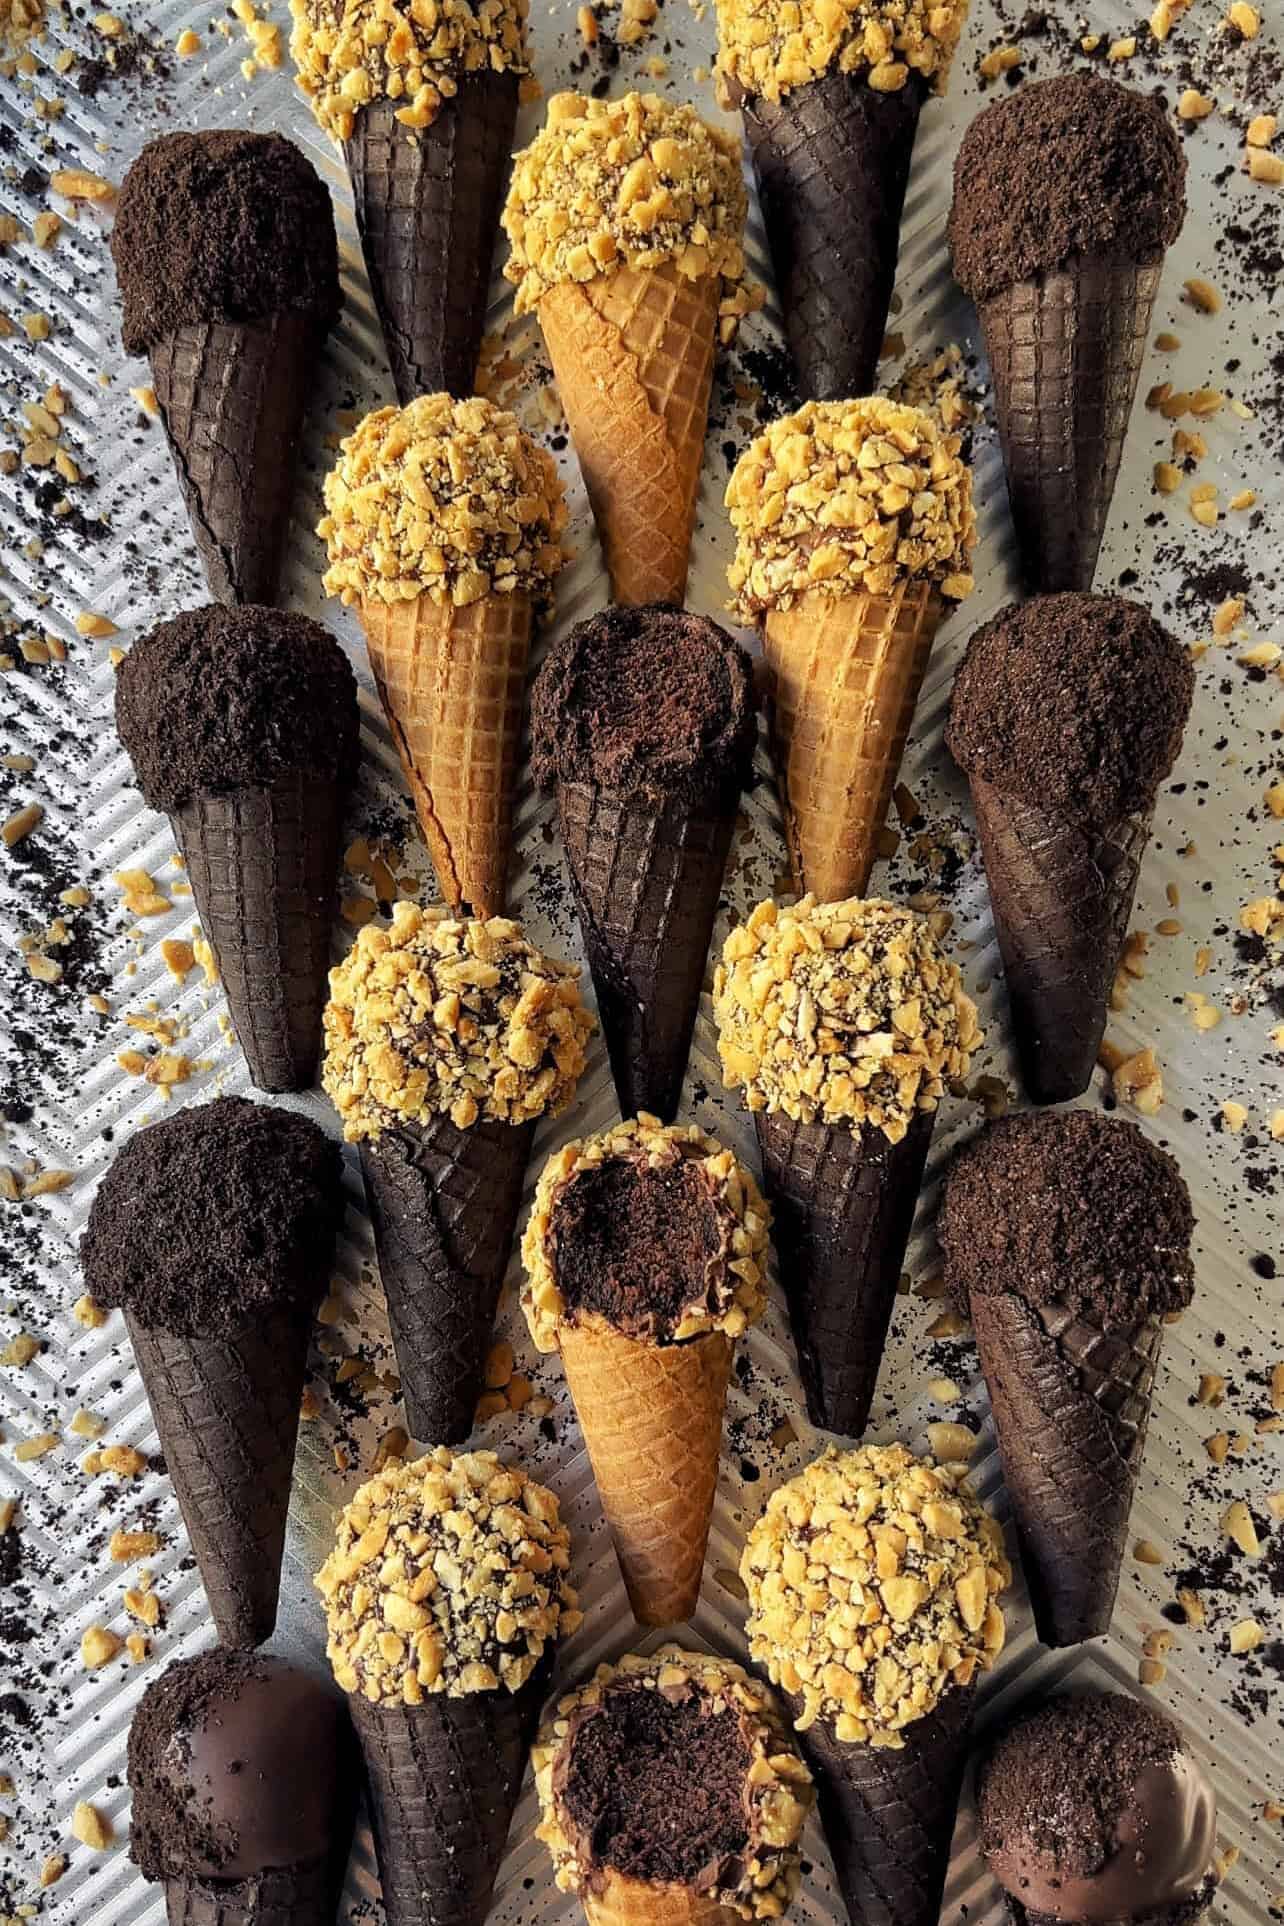
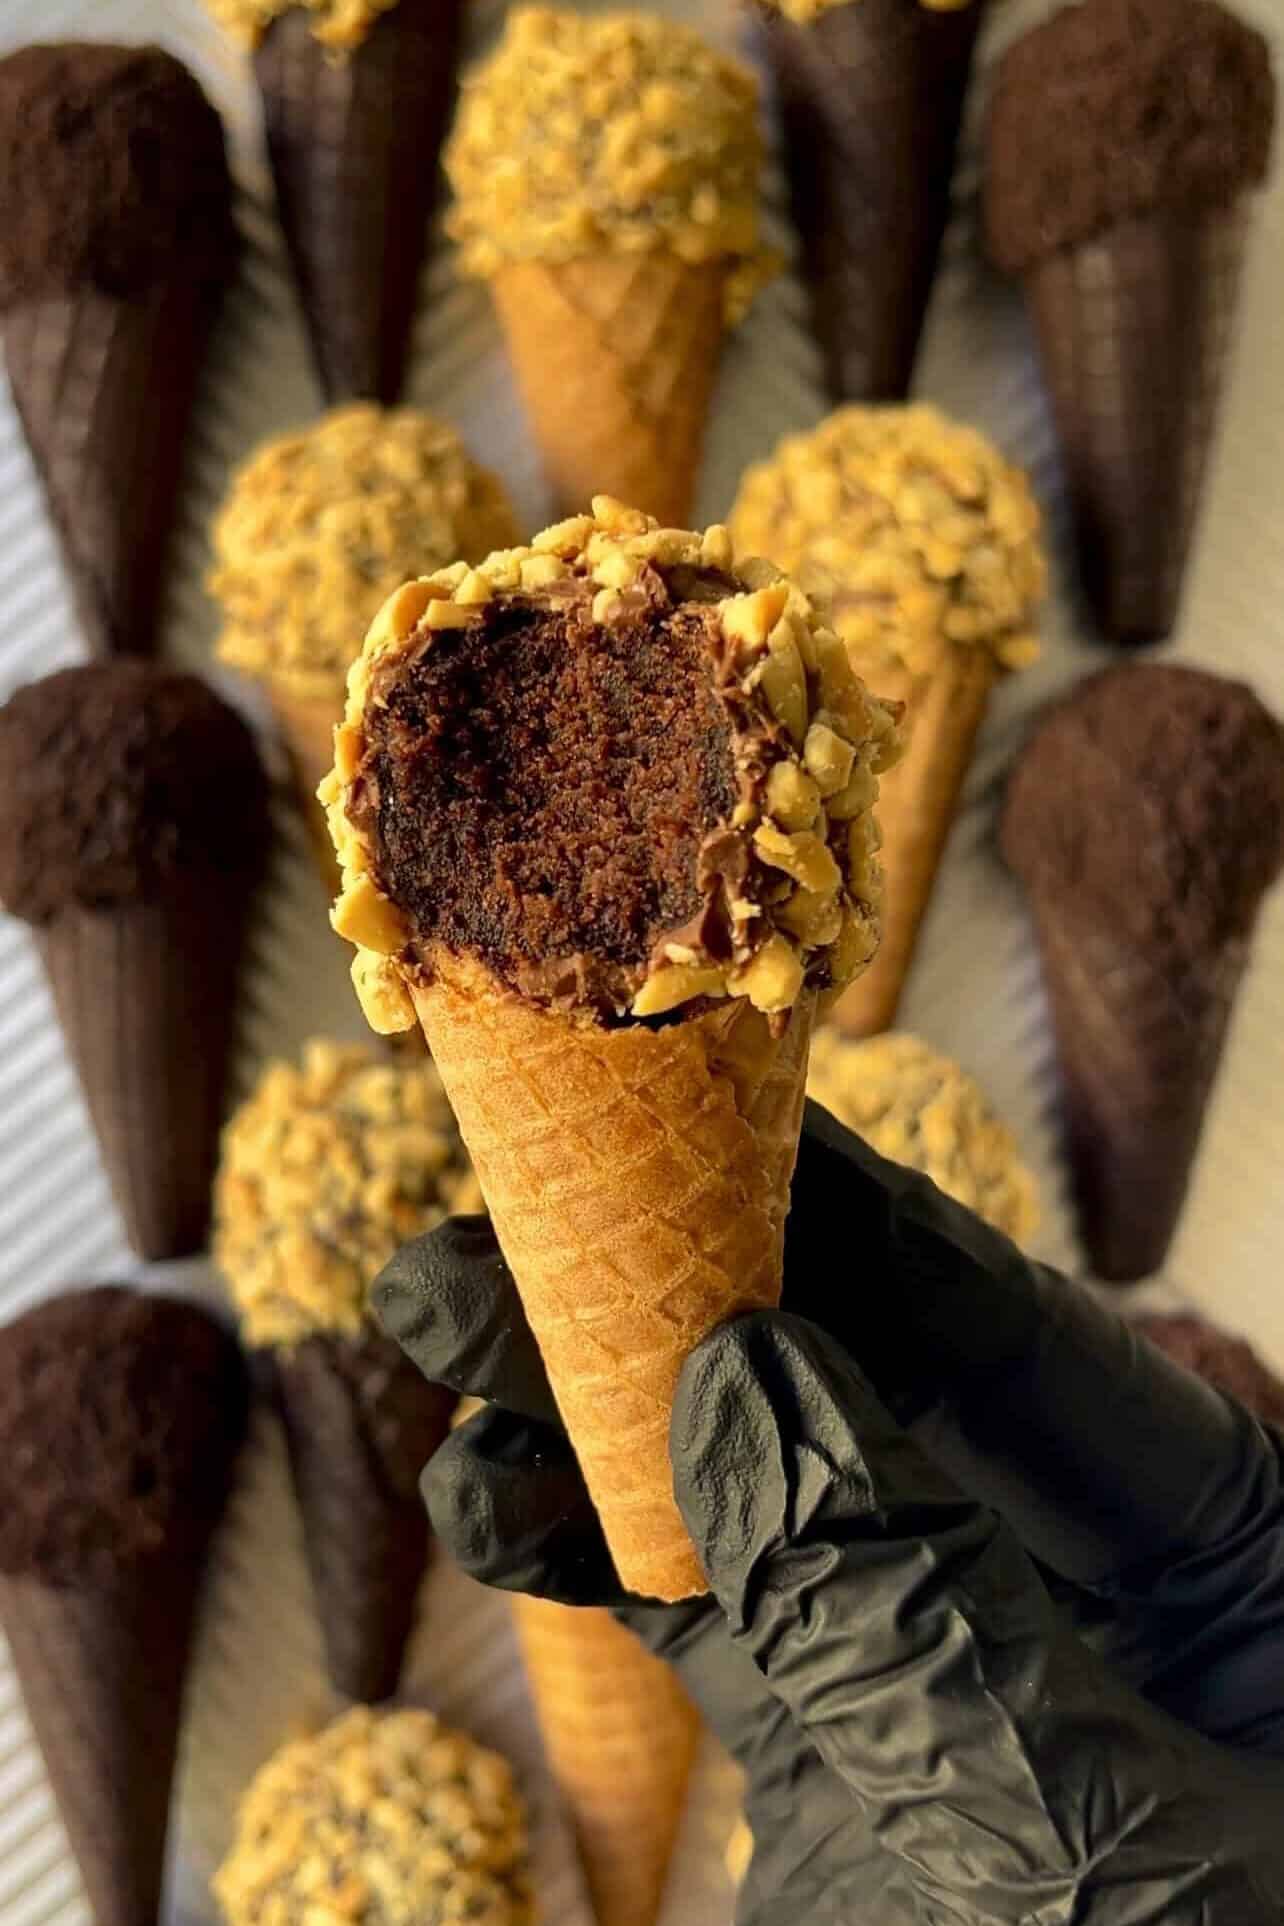
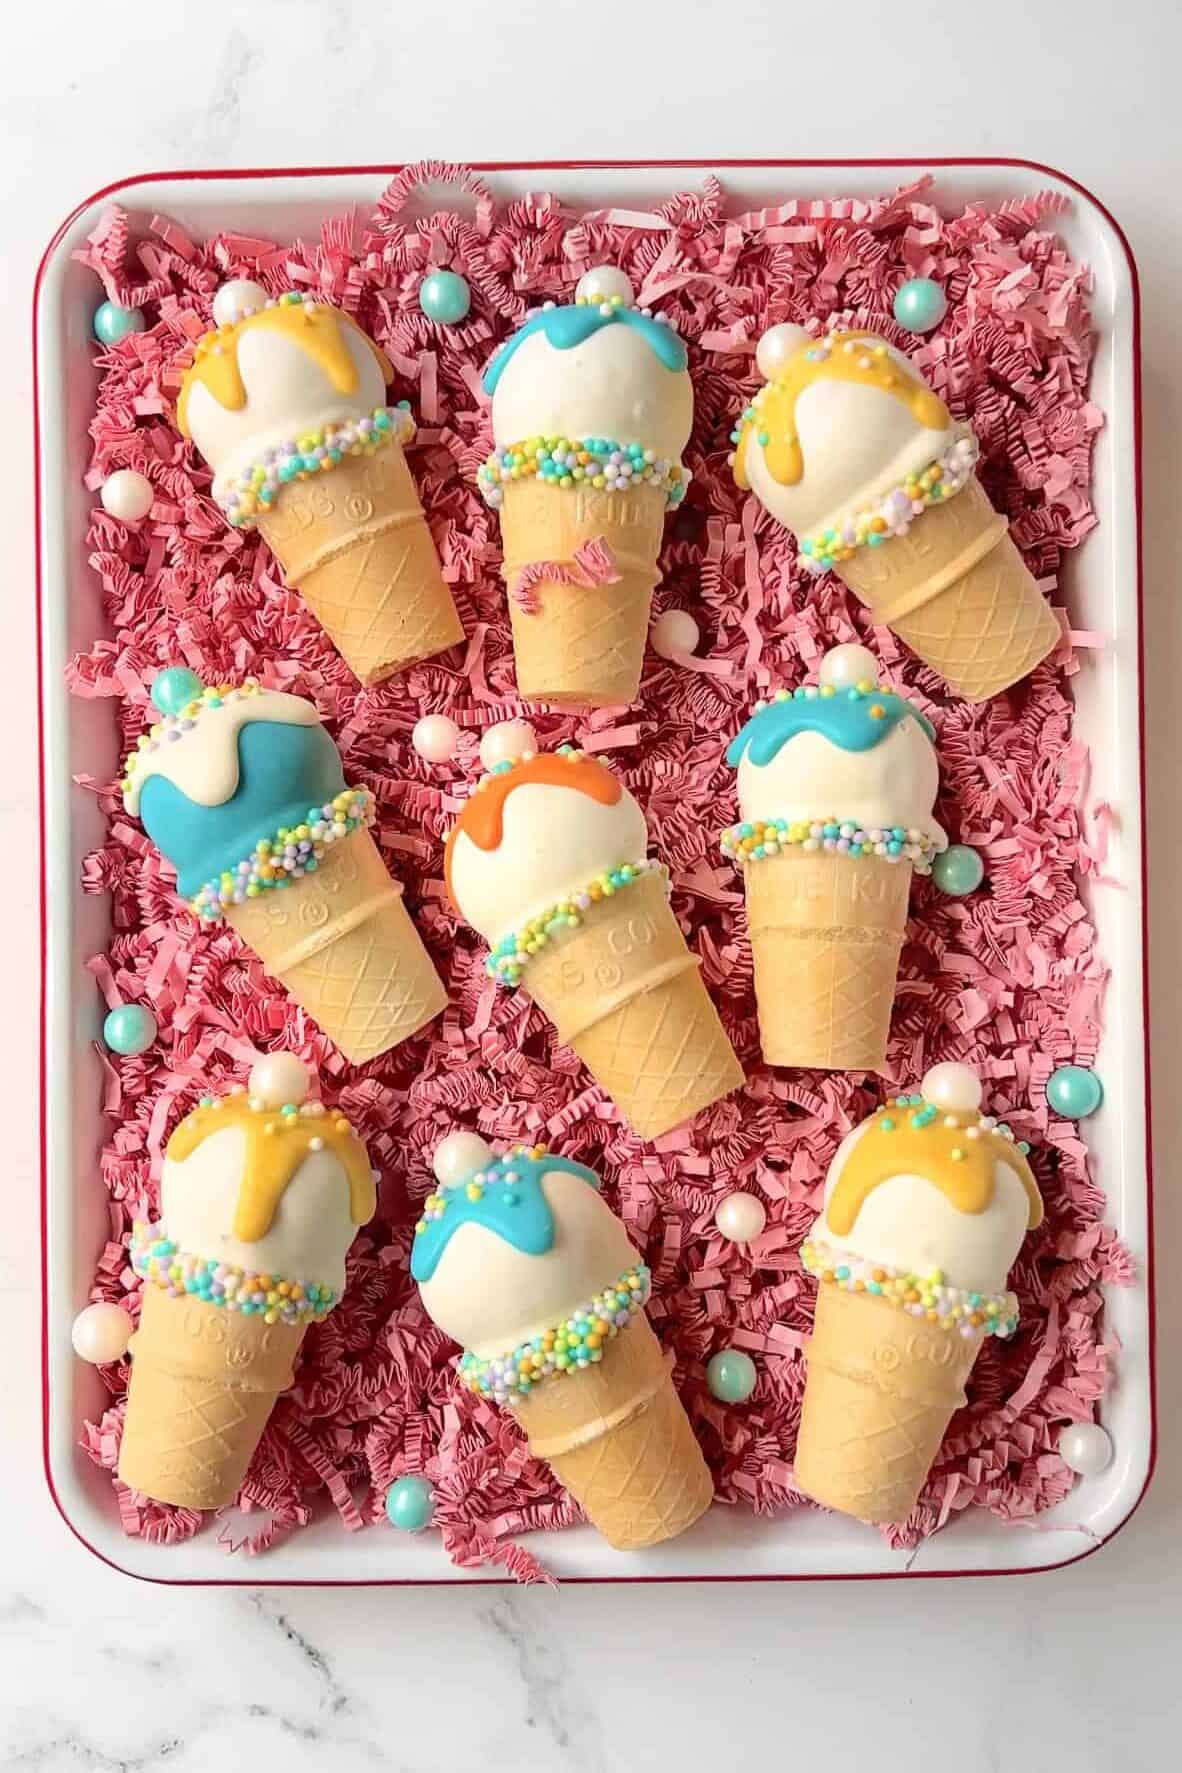
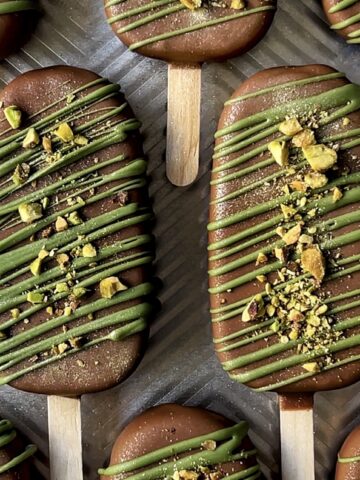
Can we take a moment for these "Drumsticks"? I made chocolate cake pops, added them to sugar and Oreo ice cream cones, and coated them with crushed peanuts and Oreo crumbs. Let me know in the comments below if we need a separate recipe card for these. The original peanut-coated "Drumstick" turned out to be my favorite!
Jump to:
Getting The Cake Right
The key to making successful cake pops from the get-go is always thinking about MOISTURE. A dry cake will NOT roll smooth cake pops, plain and simple. So we'll be covering the essential steps to ensure your bake comes out fluffy, soft, and MOIST (sorry, I know people hate that word but you will be reading it a lot).
- Elevating the box recipe: You can use ANY FLAVOR store-bought cake box mix because the basic ingredients/measurements will be the same - eggs, water, and oil as indicated on the box. One of the best tried-and-true hacks I use in every one of my cake pop recipes is substituting MILK for the water (to add flavor), and adding one EXTRA large egg (for added richness and moisture) to make the batter. Many people also replace the oil with butter, however, I do not. Although butter would enhance the flavor, oil places an important part in keeping any cake tender and moist. Plus, I add butter in the homemade buttercream I include to the cake after it's baked.
- Adding frosting (buttercream): All my cake pop recipes include a simple and easy homemade buttercream recipe you can whip up in just a few minutes using a few pantry ingredients. I always prefer this over store-bought frosting - they are way too sweet for my taste. After reading many online comments, I found out many of you do not add ANY frosting after you baked and crumbled your cake. Will they bind together well when rolling? Maybe. Will they will roll LUMPY? Perhaps. Is there a chance the cake pop will be DRY? Most likely. My point - add the frosting. Make it yourself or buy it at the store. Just add it. Not only will it make your cake pops delicious, more importantly it will help bind the cake together by adding more moisture so you can roll smooth cake pops. Let's not roll lumpy ones.
For this recipe, we'll be covering how to make cake pops CARROT CAKE FLAVOR. However if you'd like to make yours vanilla, simply use any vanilla cake mix. Same for chocolate. The full recipes (including homemade cream cheese buttercream which I HIGHLY recommend) are listed in my two cake pop recipes - Starbucks Copycat Birthday Cake Pops and Starbucks Copycat Chocolate Cake Pops.
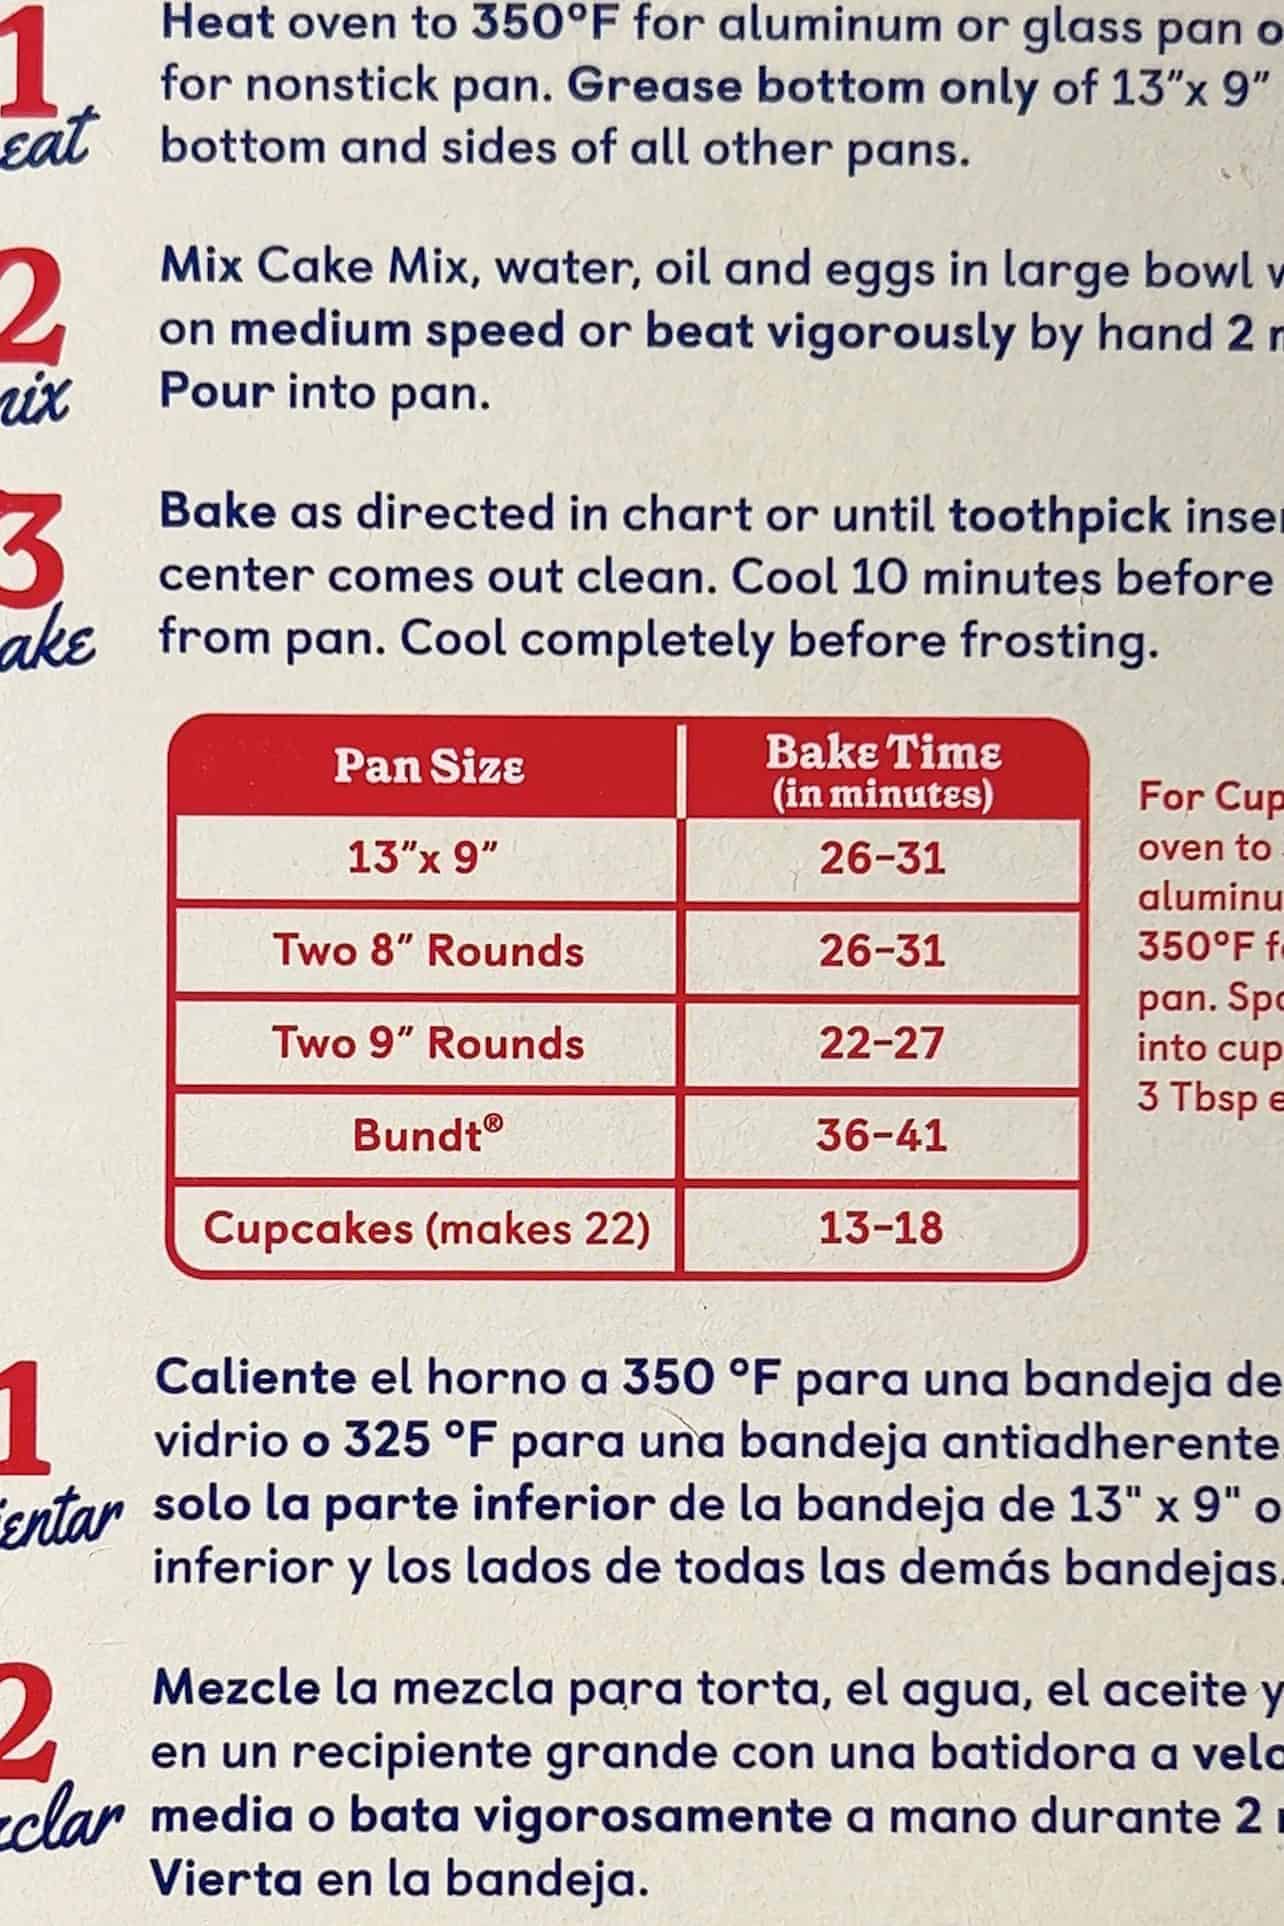
Avoid over-baking the cake: When I see pictures of lumpy cake pops, the most common culprit is the cake baked for too long. You can tell by the dry crumbles. Refer to the cake box to see what the correct bake time is for your size pan. I HIGHLY RECOMMEND taking the cake out of the oven 5 MINUTES PRIOR to check if the center of the cake has set. You can easily do this by inserting a toothpick in the center to see if it comes out fairly clean. When I bake my cake in a 9x13-inch pan in a convection oven at 350ºF , it is usually ready in 21-22 minutes. Adjust accordingly as every oven is different. So just to be safe, I usually set my timer 5 minutes less than the bake time indicated to check how it's done, and bake for longer if needed.
Supplies You Need To Make Ice Cream Cake Pops
The essential items you need to assemble ice cream cake pops are candy melts (meltables), melted chocolate, or almond bark, cake pop sticks, decorative sprinkles or nonpareils, ice cream cones, and any stand to hold the cake pops upright as they dry.
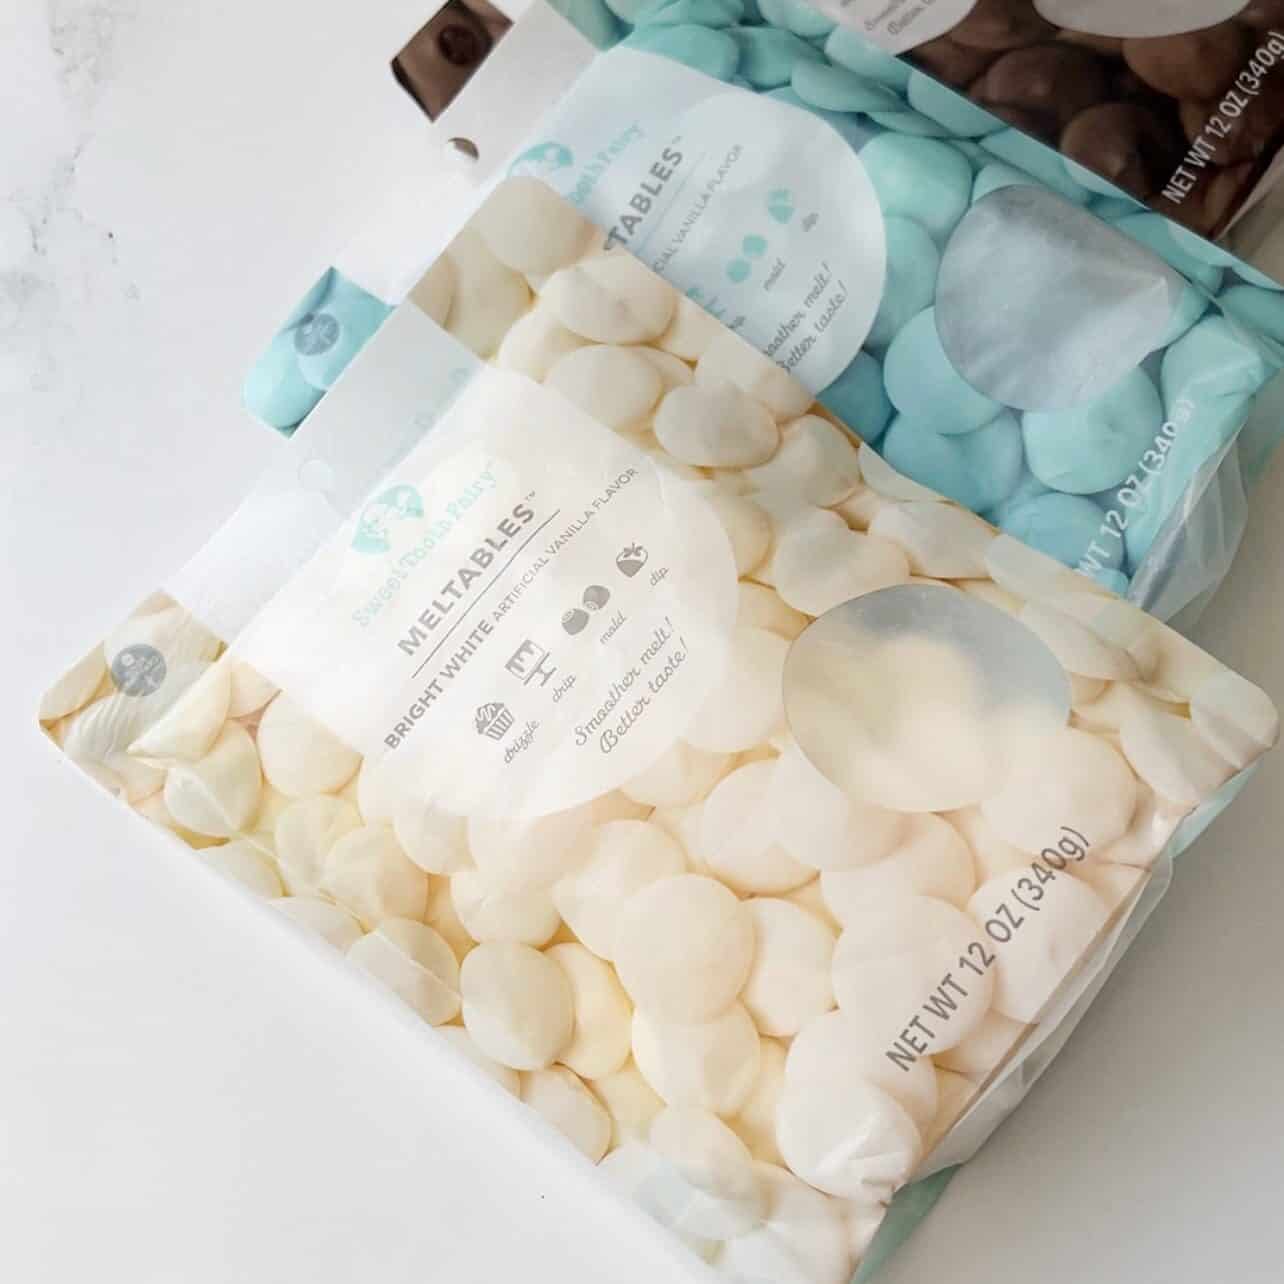
- Candy melts or melted chocolate: I prefer candy melts over using real chocolate or almond bark for making cake pops. They melt and re-melt smoothly. I microwave it in a heat-safe bowl or cup in 15-30 second increments until I reach a thin flowing consistency. I have had great luck using Sweet Tooth Fairy Meltables I find at my local Michael's Arts & Crafts store. Melting real chocolate adds the task of tempering them, and if done improperly, you may see unsightly streaks from the chocolate blooming and also have a greasy texture. Many bakers also rely on adding coconut oil to thin their chocolate. You would also have to color them to match your theme with oil-based food coloring. These are just a few reasons I simply stick to candy melts. If using real chocolate or almond bark works for you, continue doing it!
- Sprinkles, nonpareils, and cake pop sticks: These are just a few of sprinkles and nonpareils I used to make my ice cream cake pops. I don't have any brand preference, I just look for the color. You can find these easily at Walmart, Target, any arts & crafts store, and Amazon. The cake pop stick lengths I recommend using are the 4-inch (10.1cm) and 6-inch (15.2cm) sticks. They may also be labeled lollipop sticks.

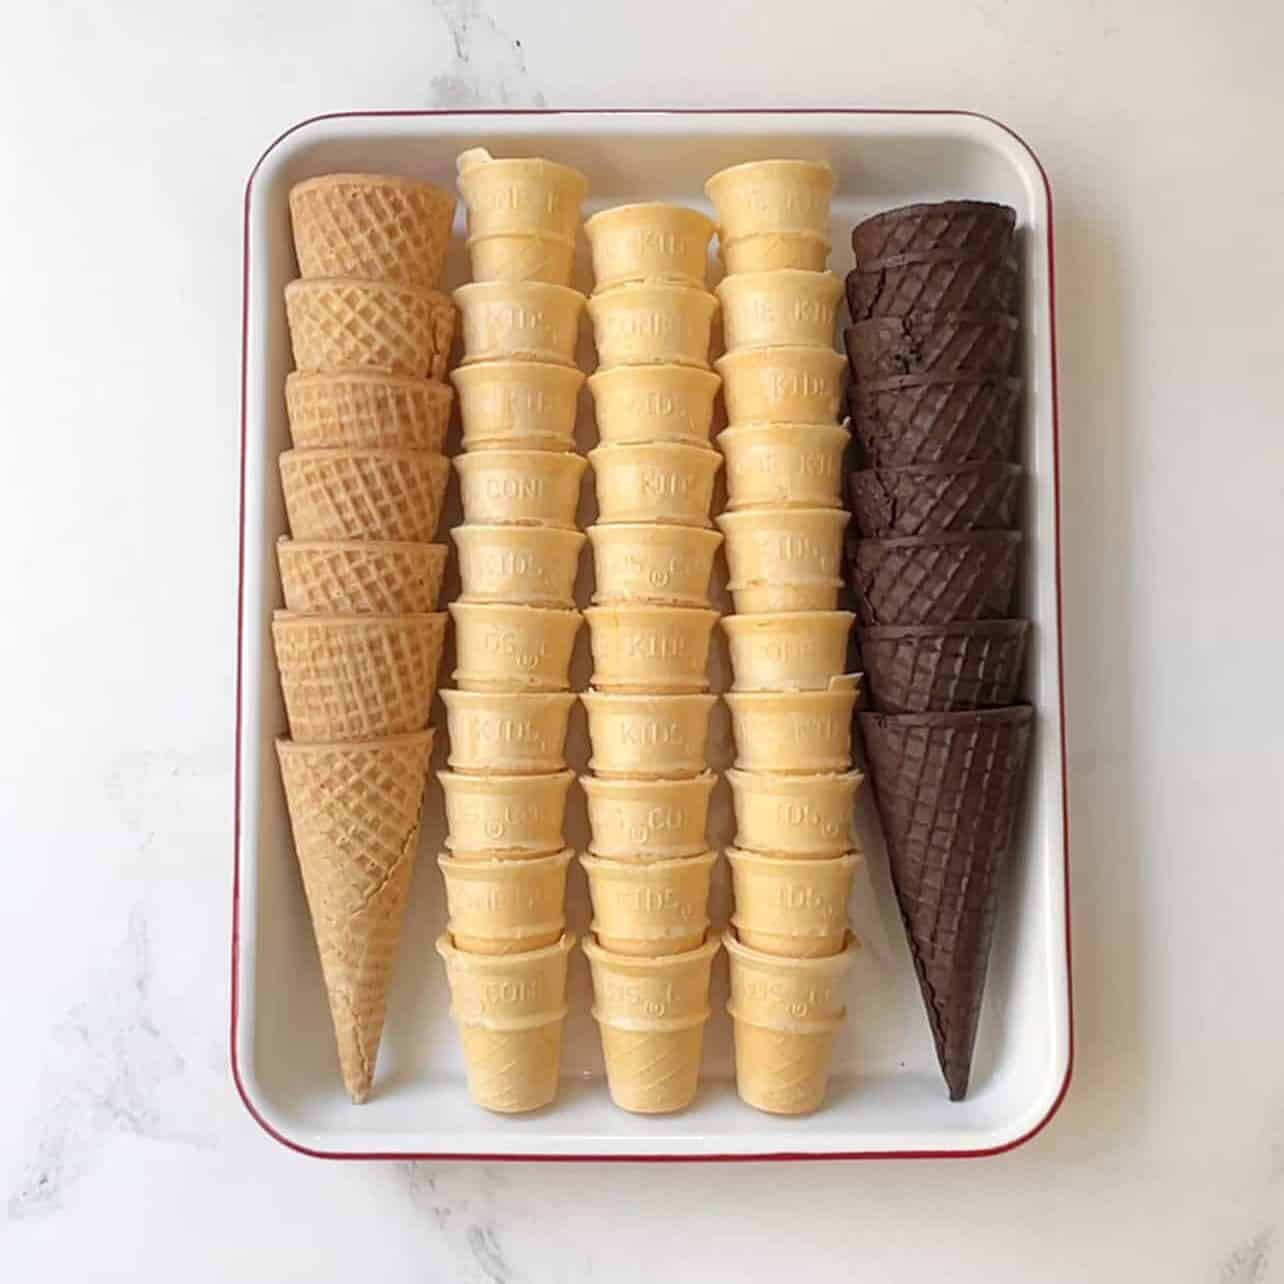
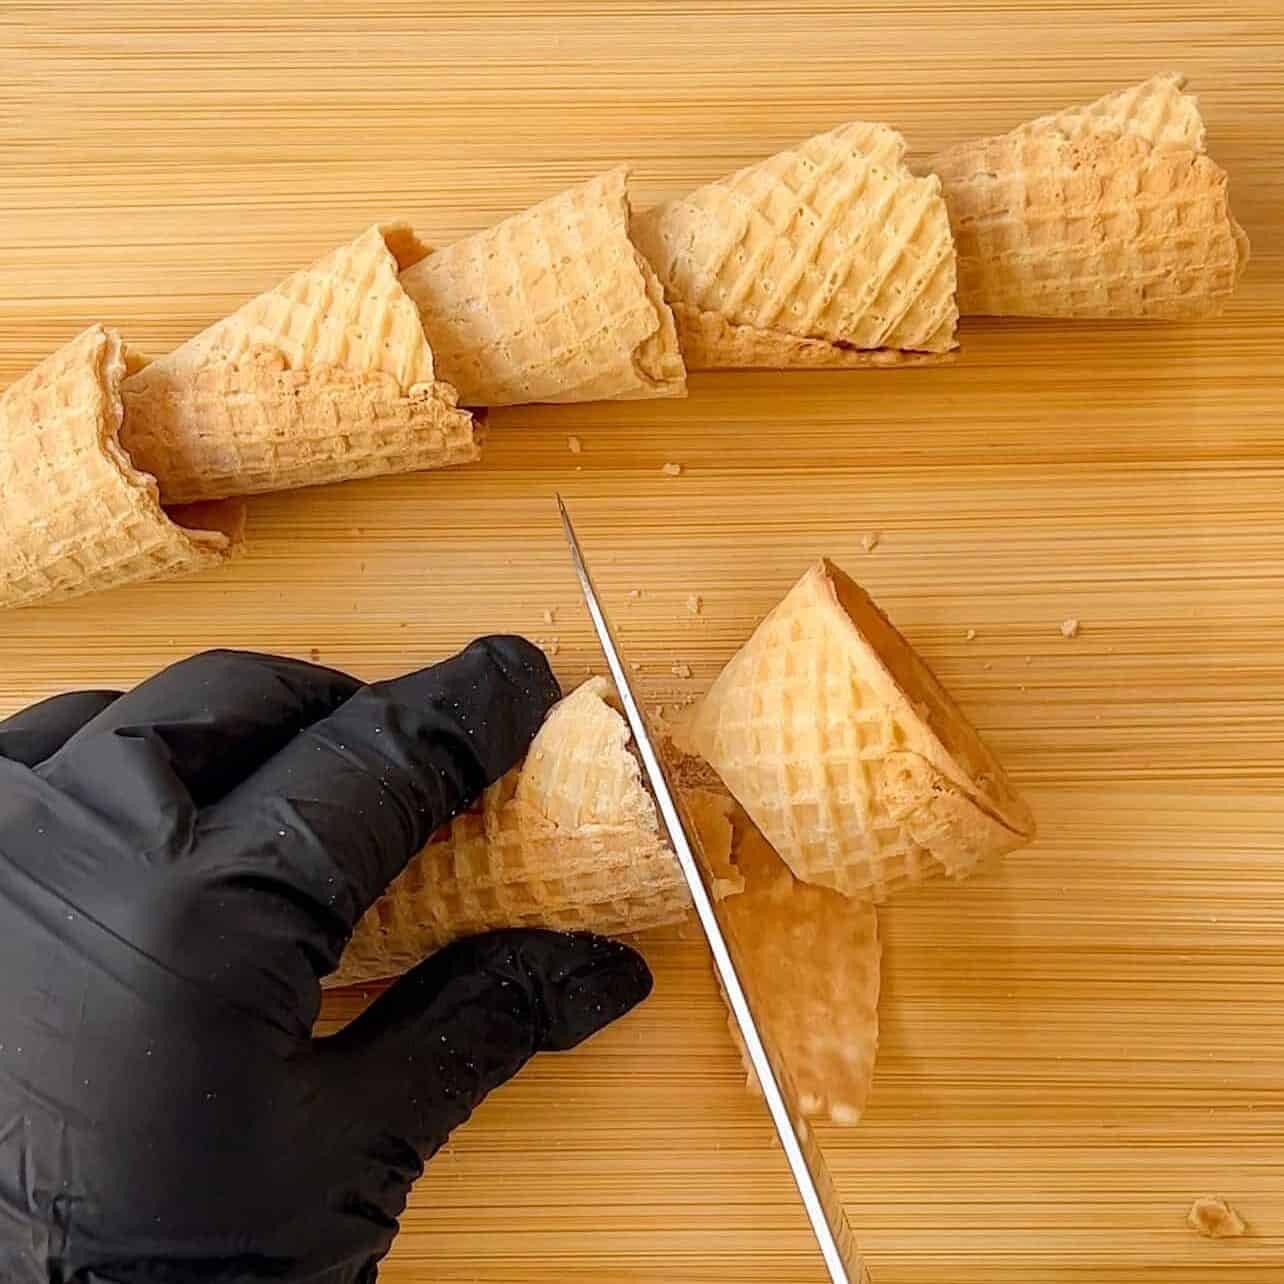
- Ice Cream Cones: The mini cones are definitely the easiest - all you need to do is poke a hole through the bottom. This allows the cake pop sticks to go through. When using sugar or Oreo cones, simply cut them down to size. Chop off about ⅓ of the cone, and a little off the bottom.

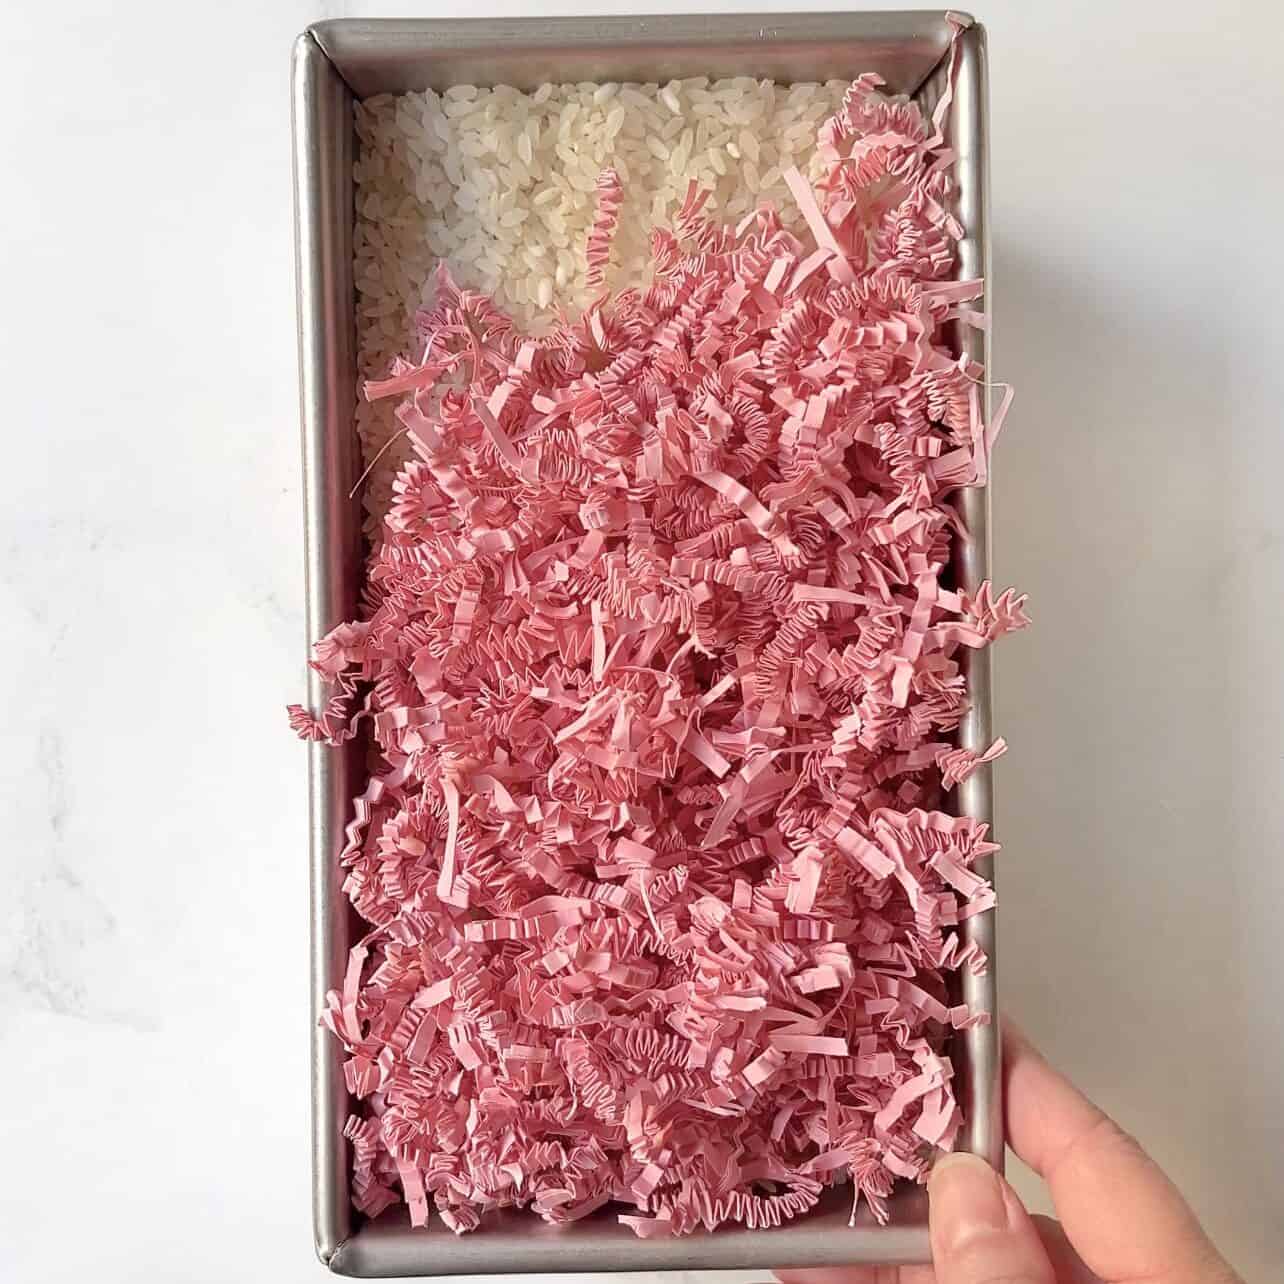
- Stand to hold cake pops while they dry: The easiest thing to use is a circle or block of styrofoam. The sticks can easily be inserted in as the candy melts set, and you can reuse it over and over. If you want an alternative, a clever hack I learned recently that works GREAT is filling a deep empty loaf pan with rice or beans. You can also decorate the top if you use:
Key Notes About The Cake Ingredients
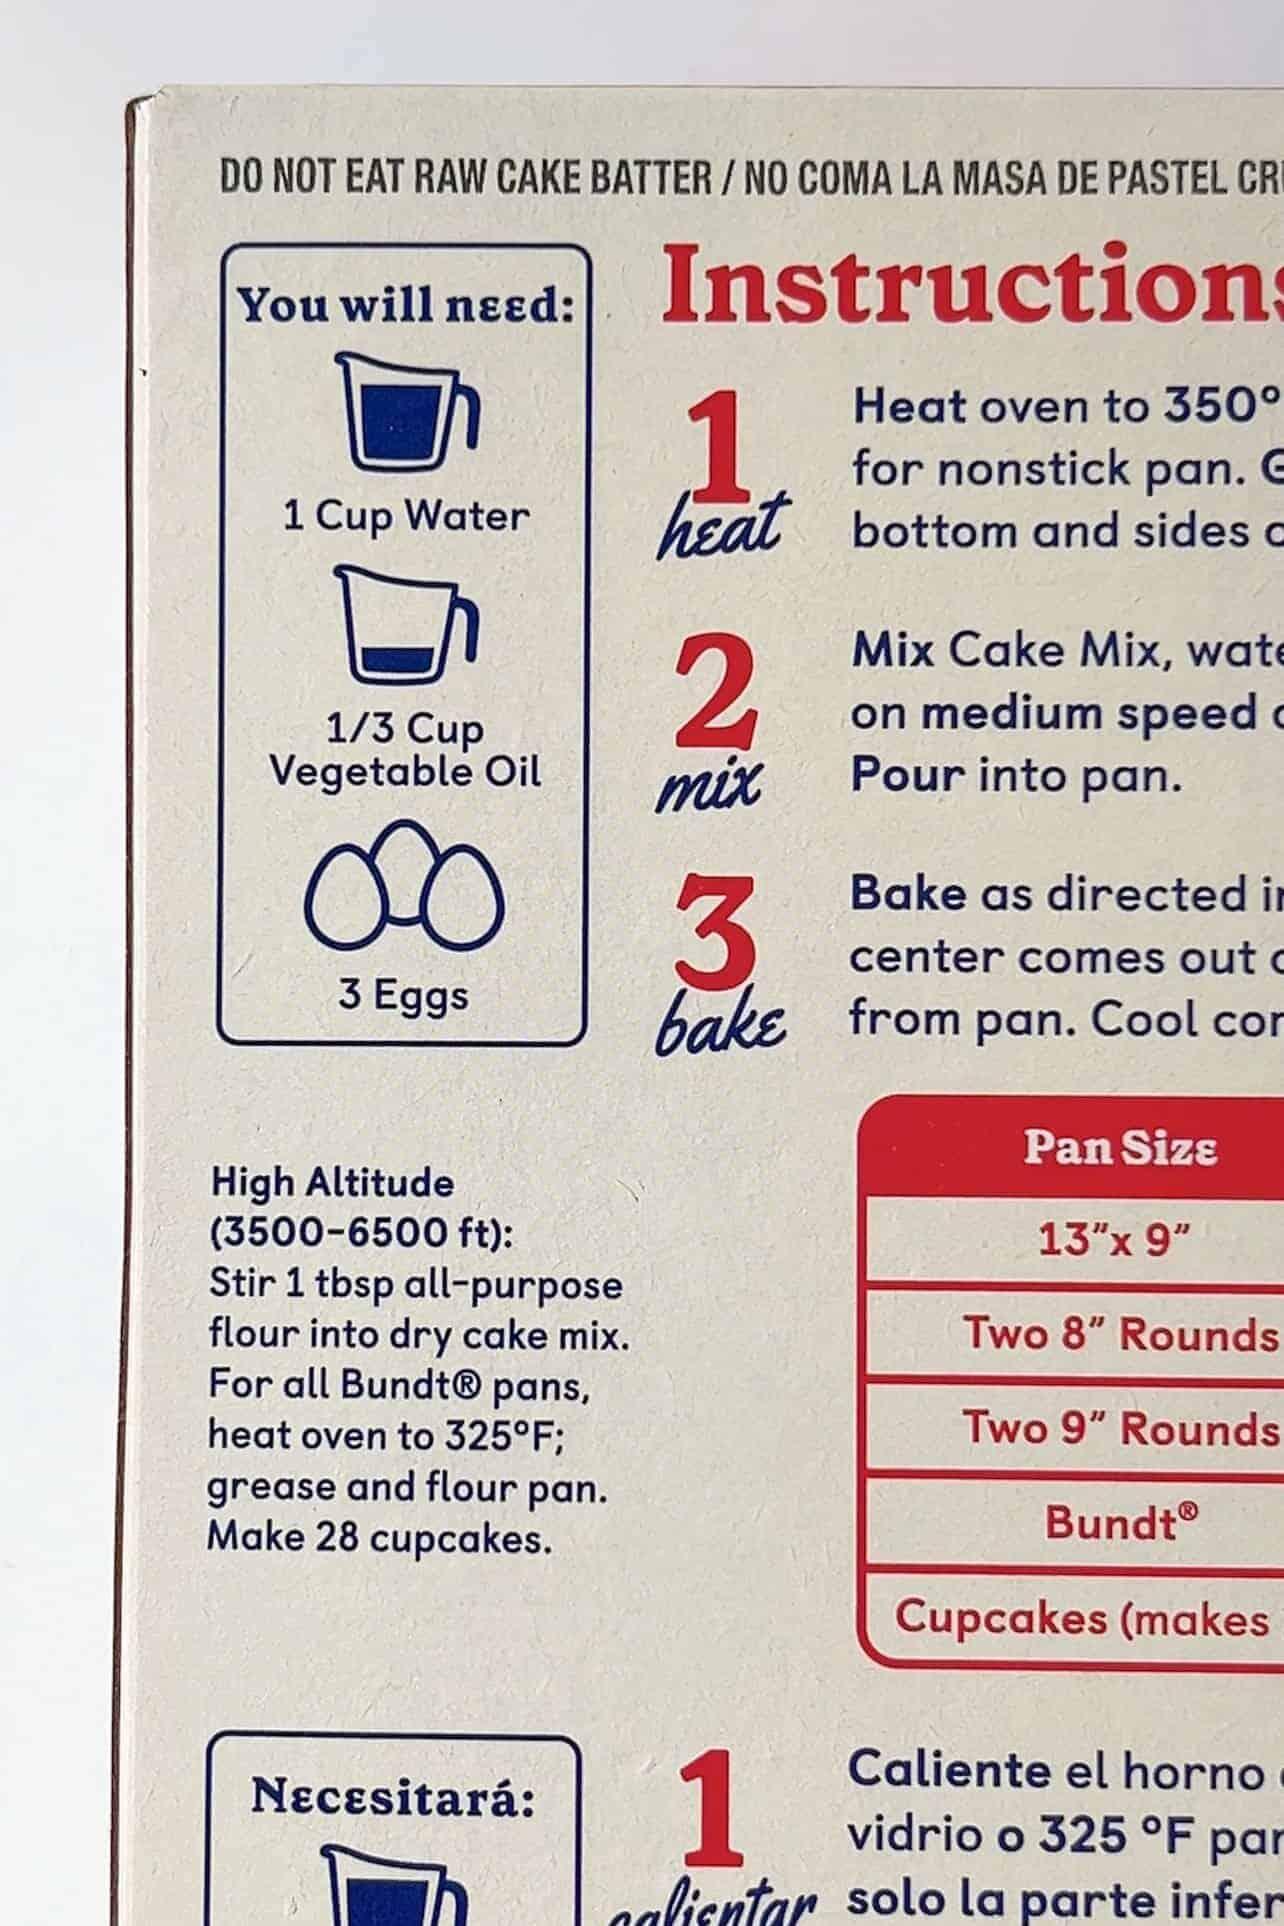
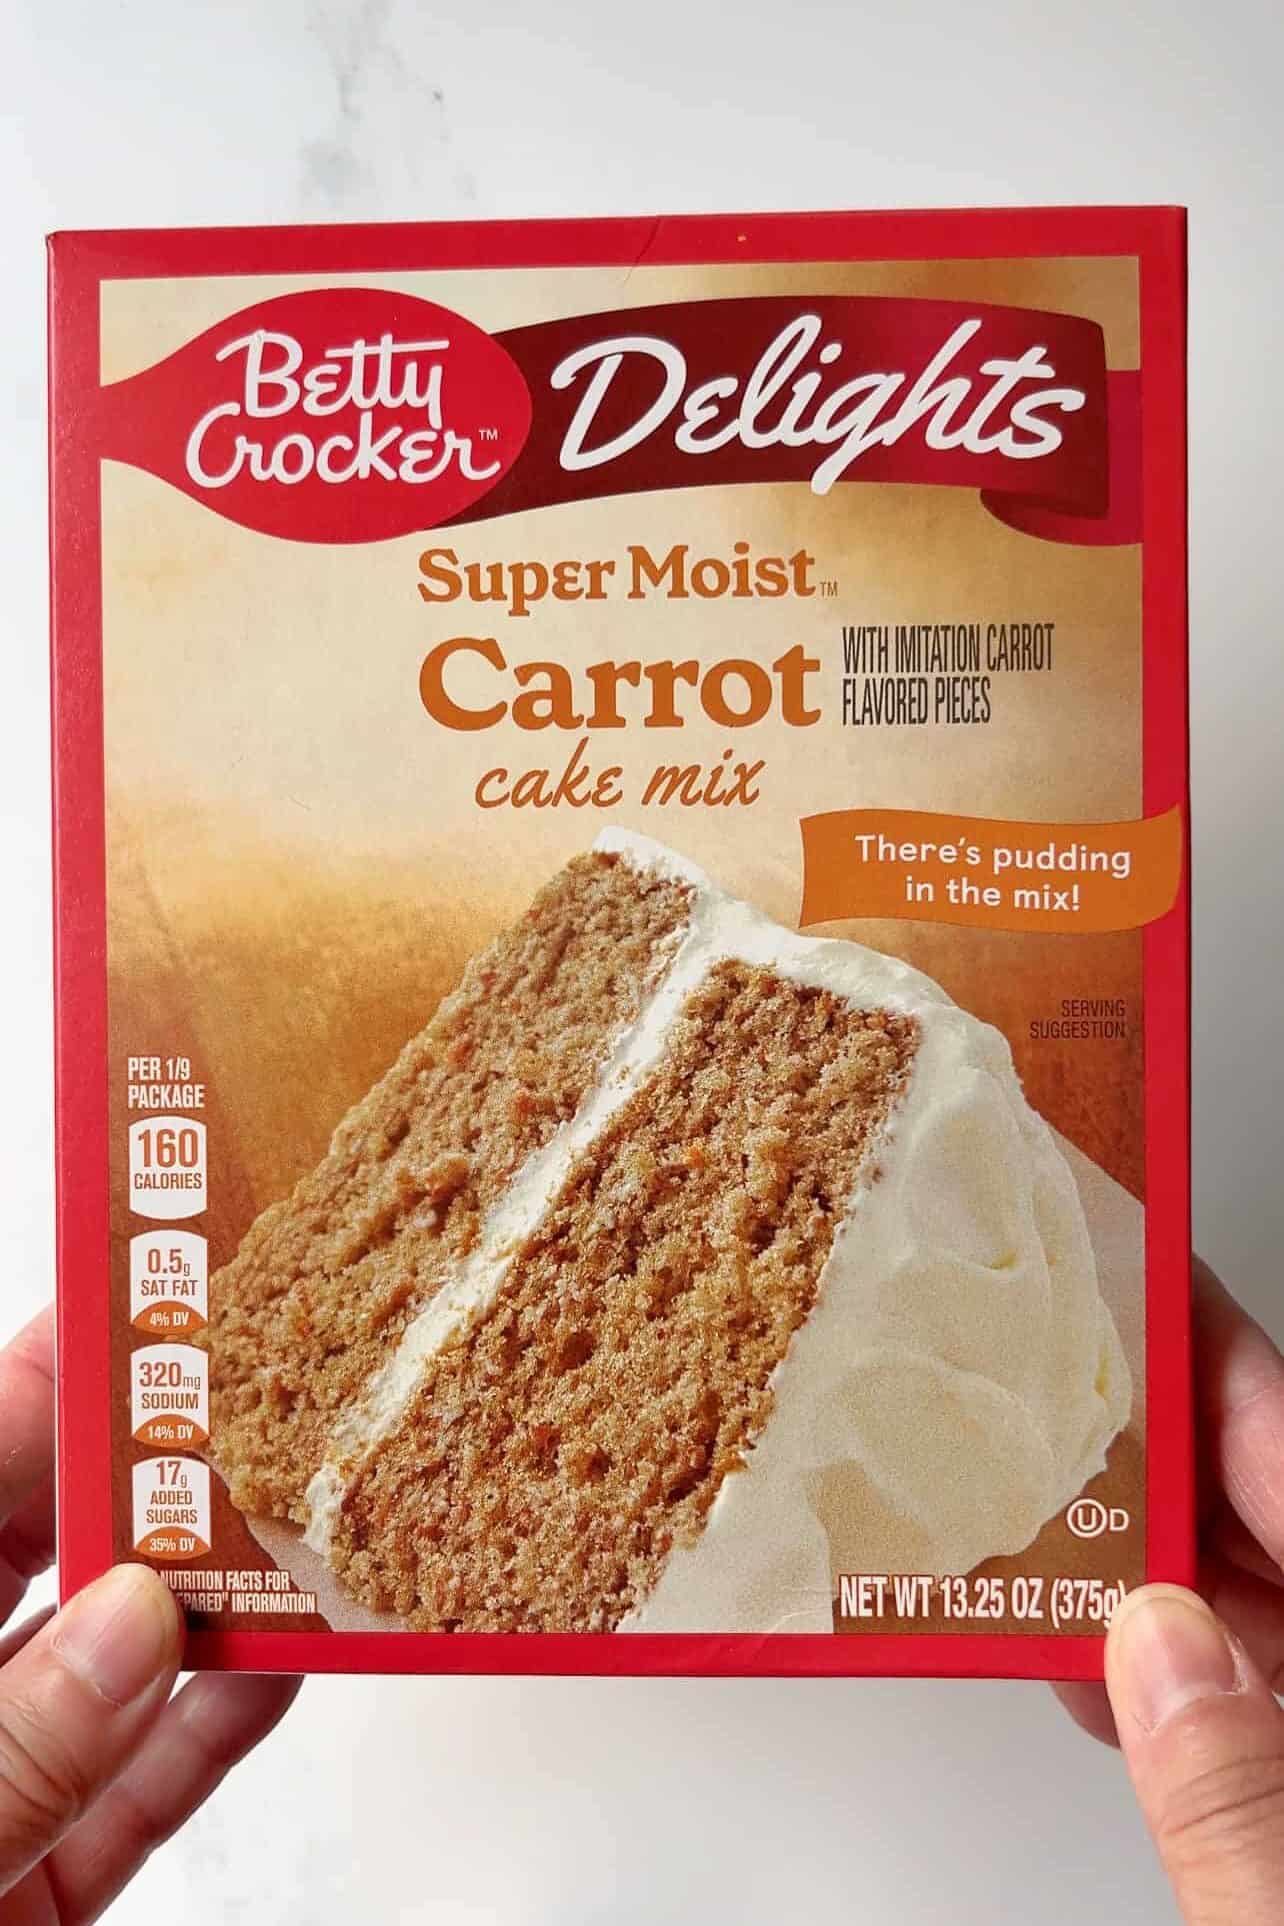
- Use any store-bought 13.25oz (375g) cake mix: If you purchase a cake box that is 15.25oz, your cake texture may come out drier. Any brand works - Betty Crocker, Duncan Hines, Pillsbury, Kroger. And I apologize if any of these brands are on the boycott list.
- Eggs: Use large eggs, and we'll be adding an extra one (4 total) for adding moisture and richness. This works great when baking cupcakes!
- Milk or water: Water simply doesn't add any flavor, but milk does. Although I have never tried using alternative milks (almond, soy, oat), I'm certain they will work just fine.
- Oil: Use any neutral oil - avocado, vegetable, canola, grapeseed, sunflower, safflower, etc. I've had many people tell me using butter instead gives the cake more flavor. Very true! However, the goal here is bake a moist cake to roll for cake pops. For this task, I feel oil does a better job keeping the cake texture from drying out. Plus, we're adding buttercream later on.
How To Make Ice Cream Cake Pops
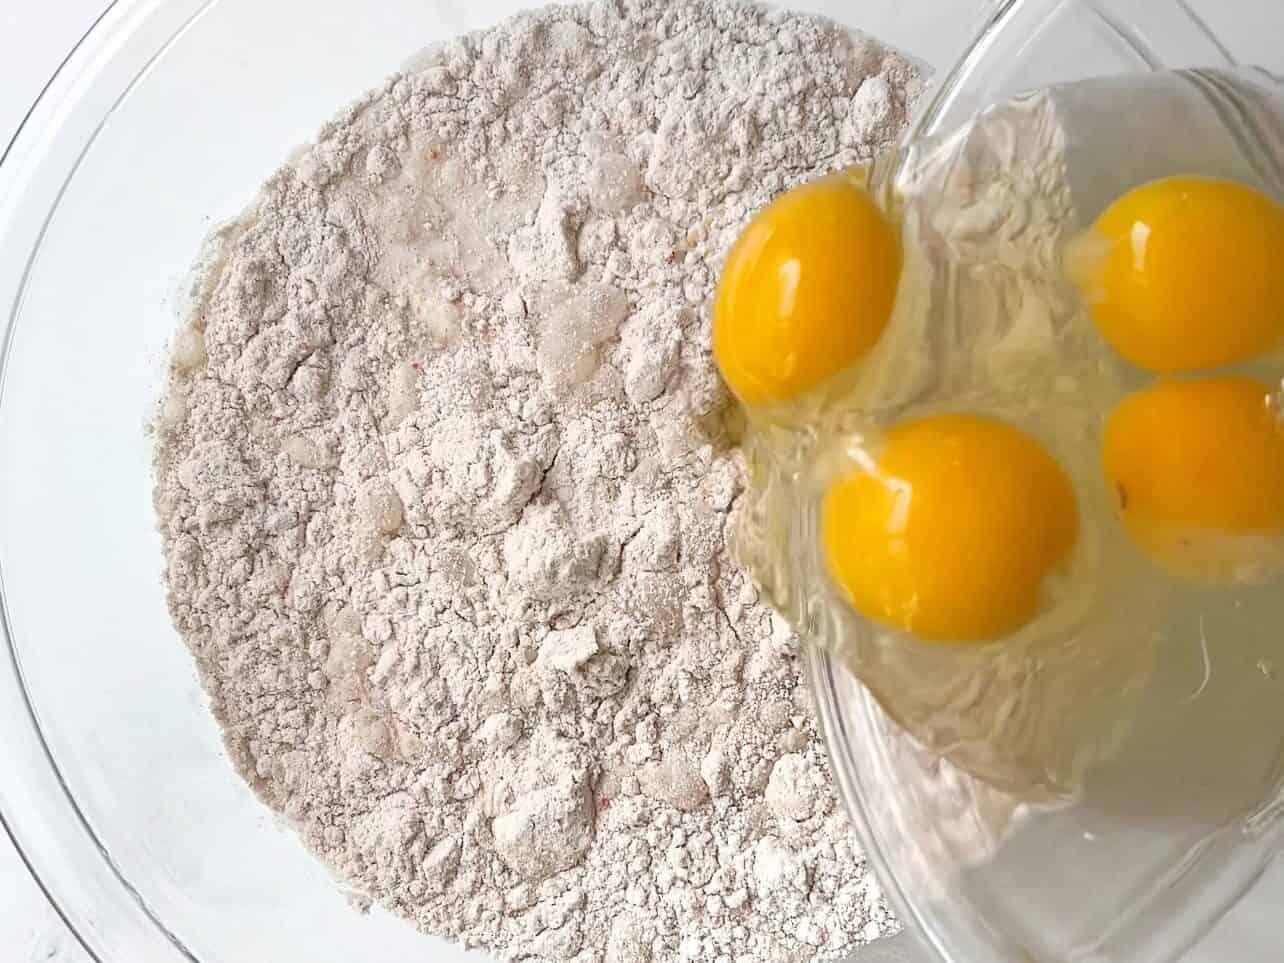
Combine cake mix, milk, oil, and eggs into a large mixing bowl.
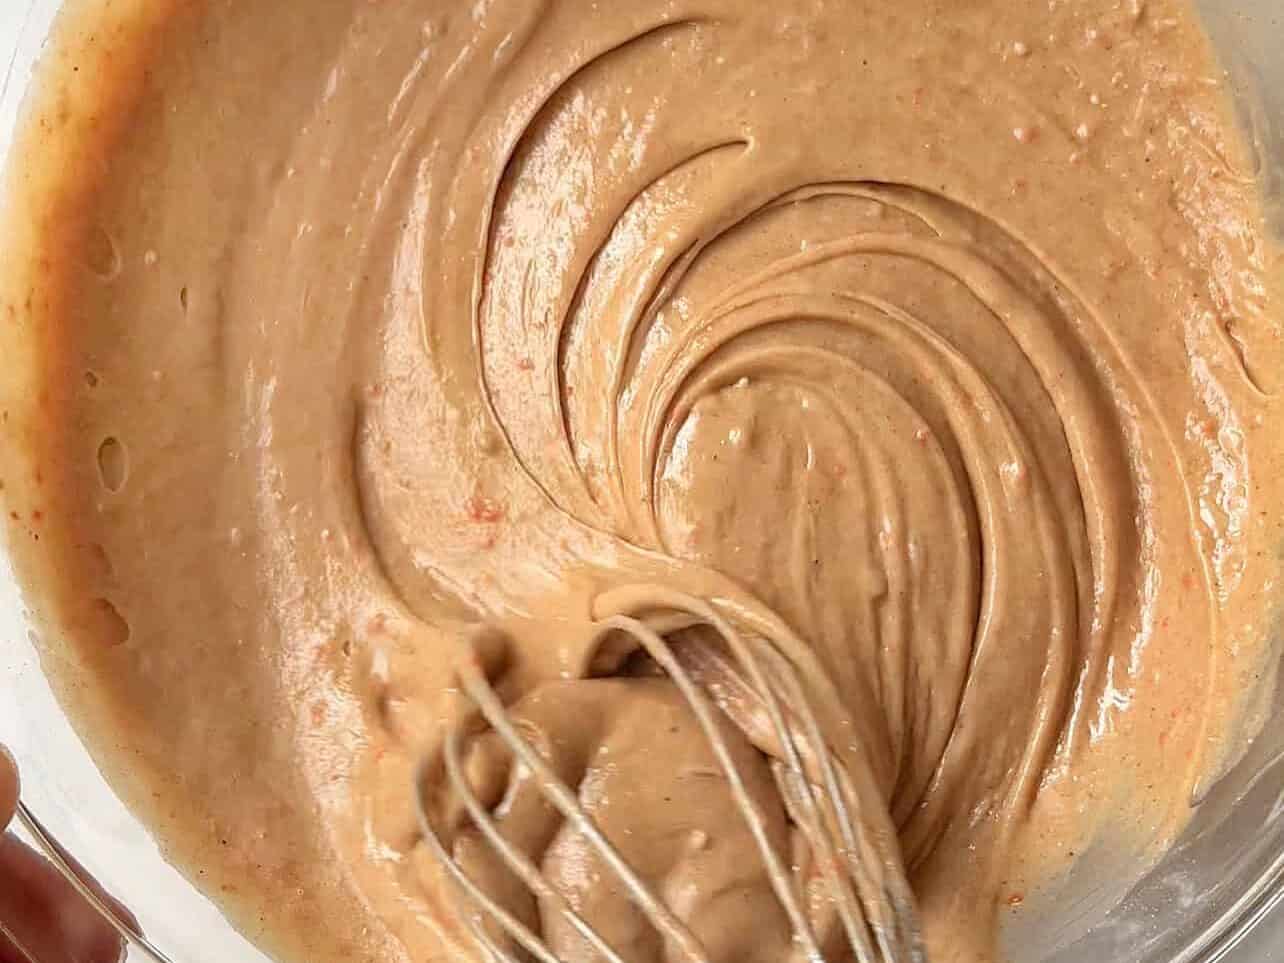
Mix just until no dry flour is visible. Do not over-mix.
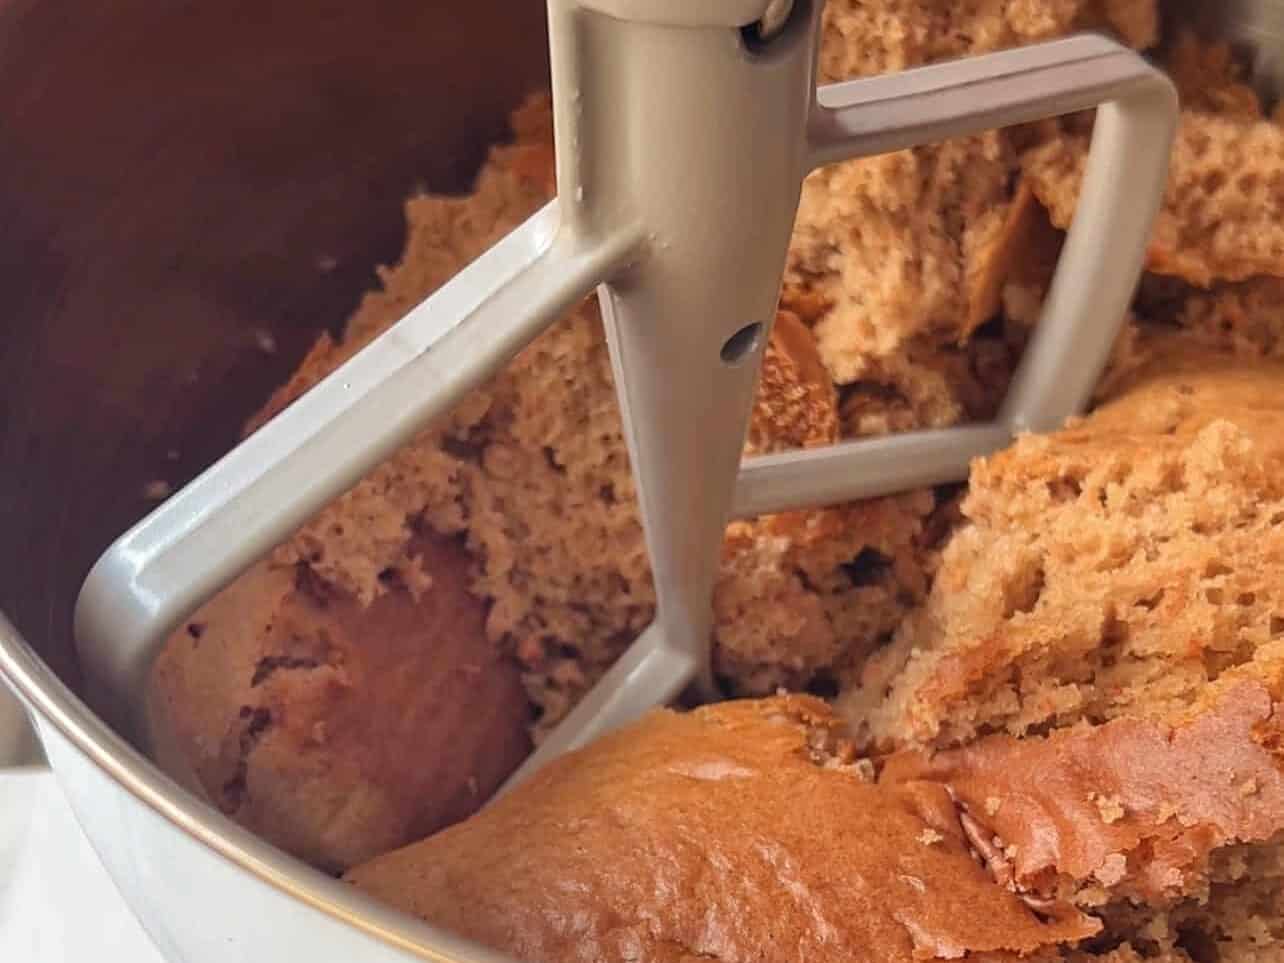
Avoid over-baking your cake. Set timer for 5 mins prior to cake box baking time to see if center is cooked through. Transfer baked cake to mixer and crumble immediately while it's still hot with a paddle attachment.
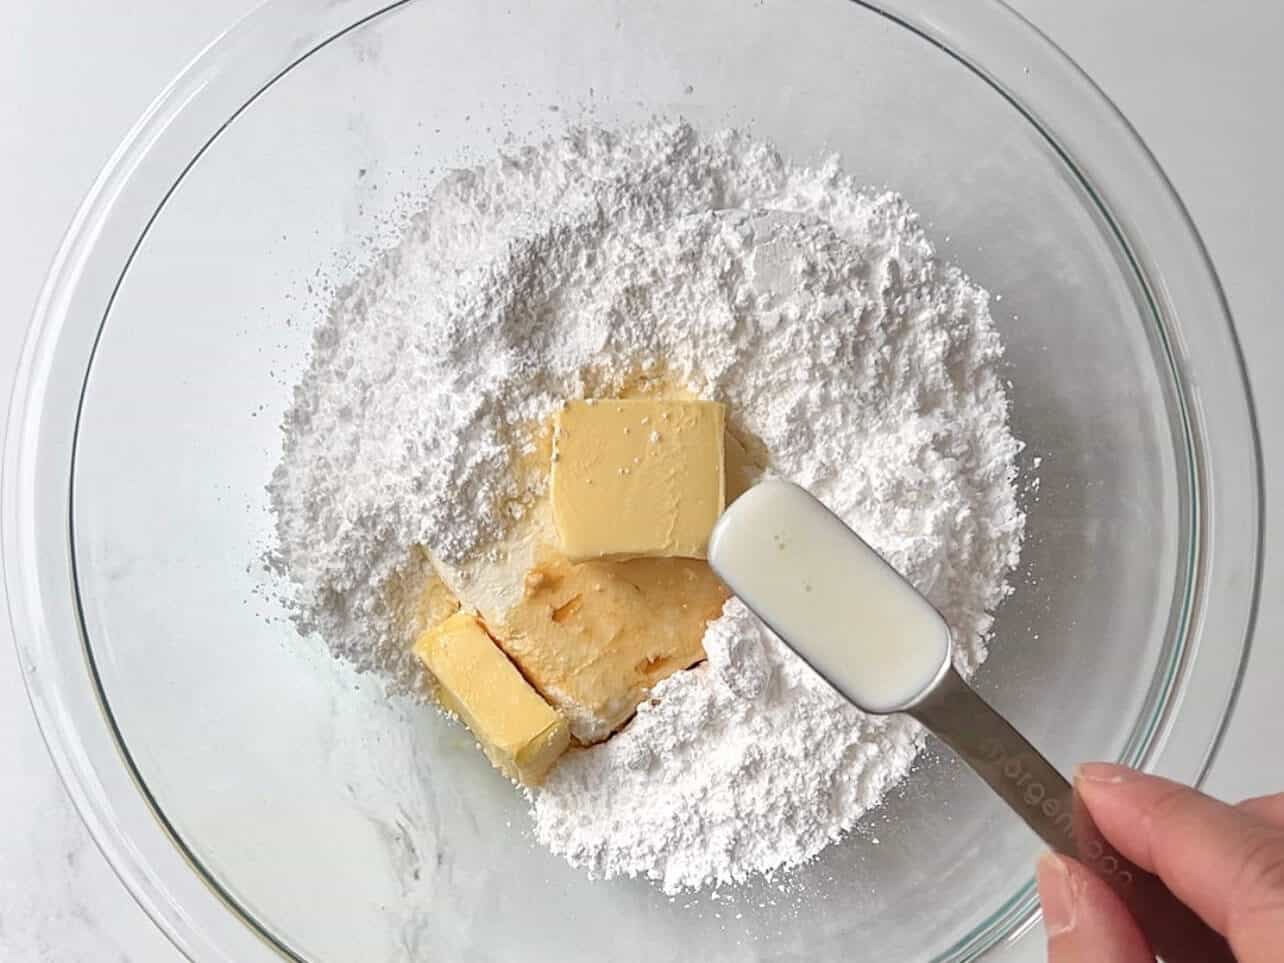
In a small bowl, make a quick cream cheese buttercream. Add milk as needed.
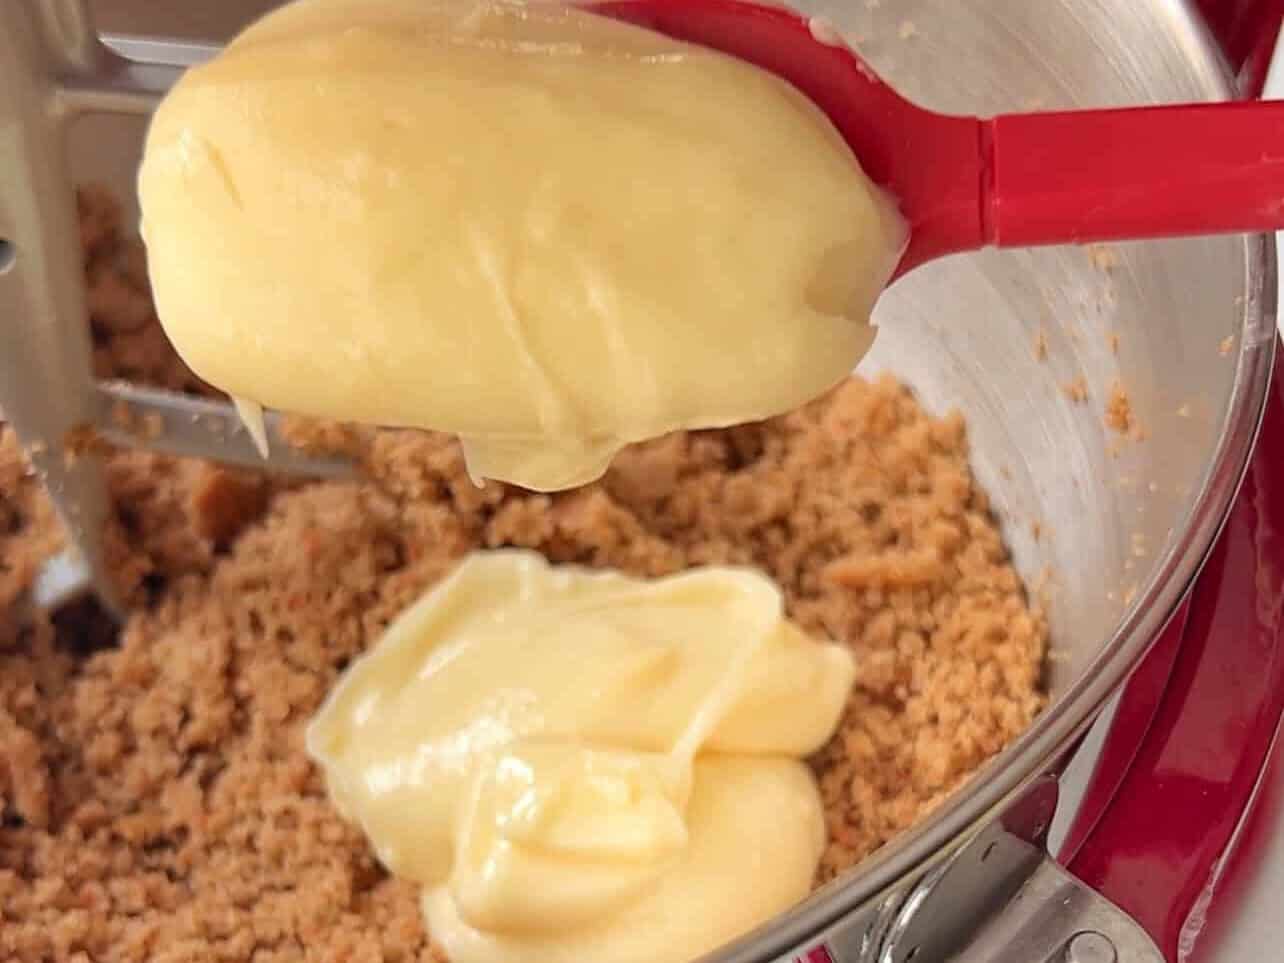
Add buttercream to crumbled cake and mix.
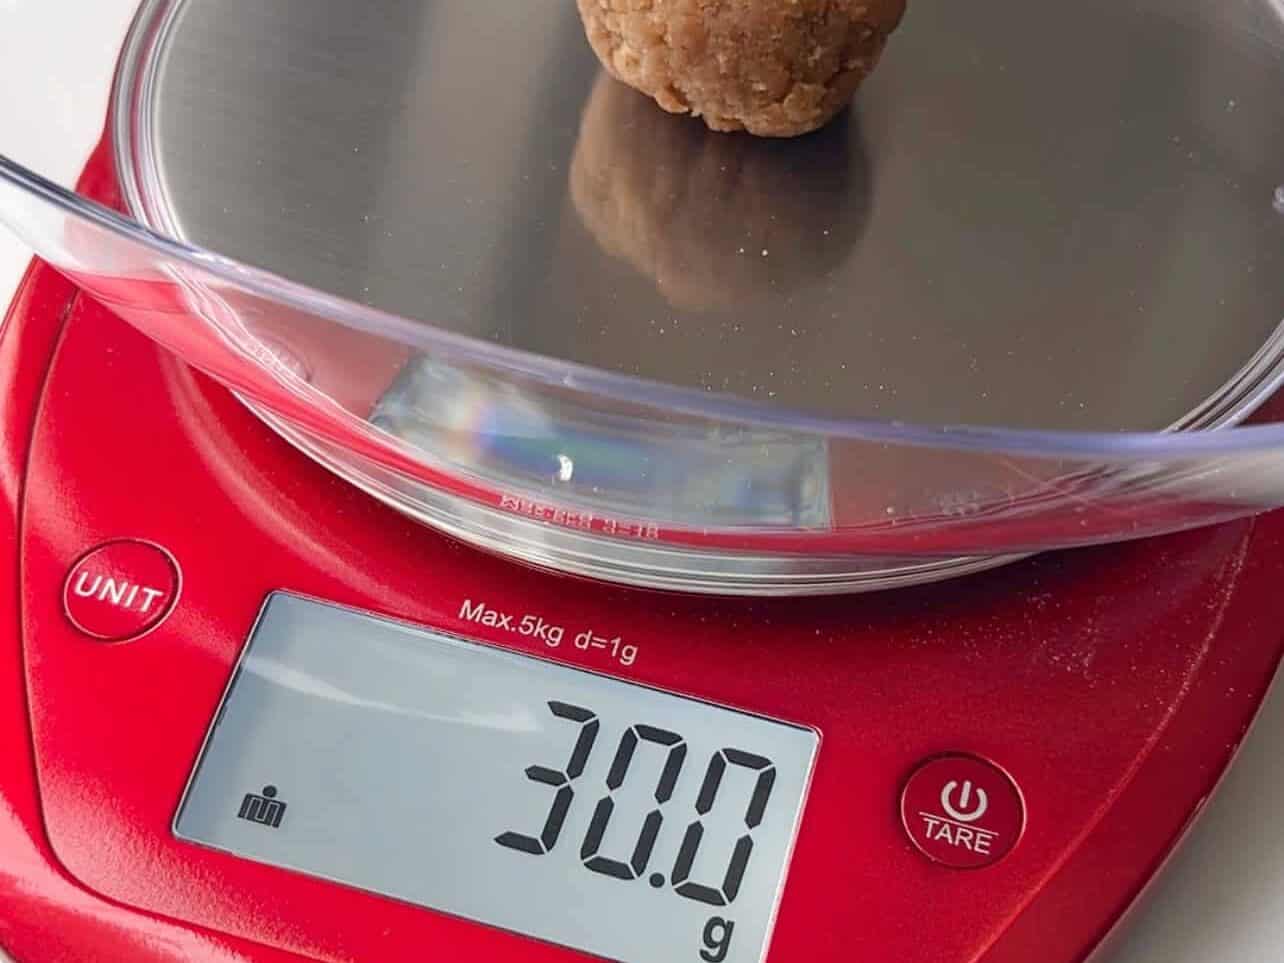
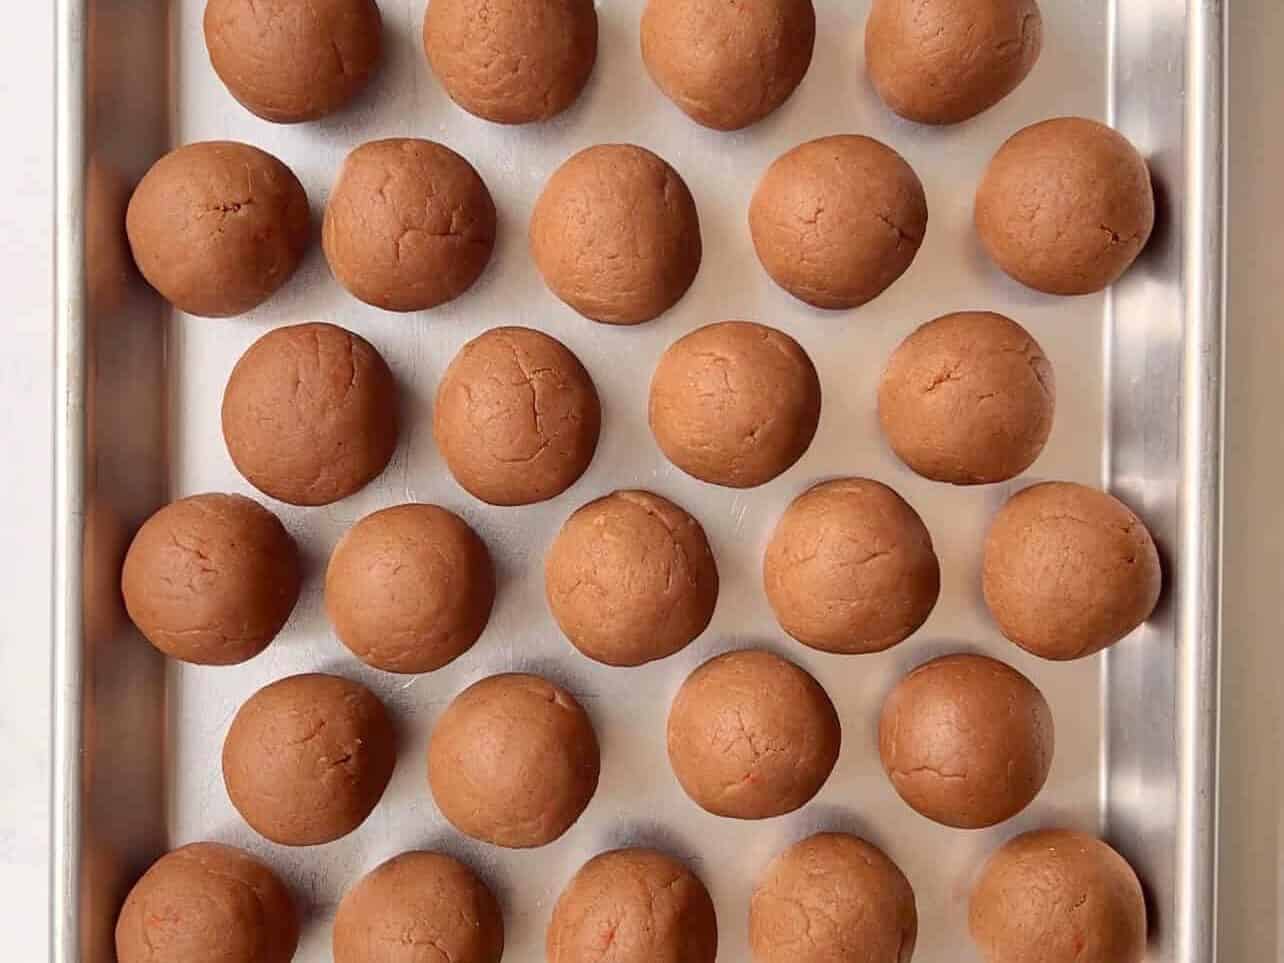
For best results, weigh your cake pops evenly around 30g (approx 1¼ inch or 3cm in diameter). If they are heavier than 34g, cake pops may be too heavy and fall off the stick.
Chill in freezer for 15 mins, or longer in the fridge. DO NOT SKIP any chilling steps, or cake pops may fall apart while assembling.
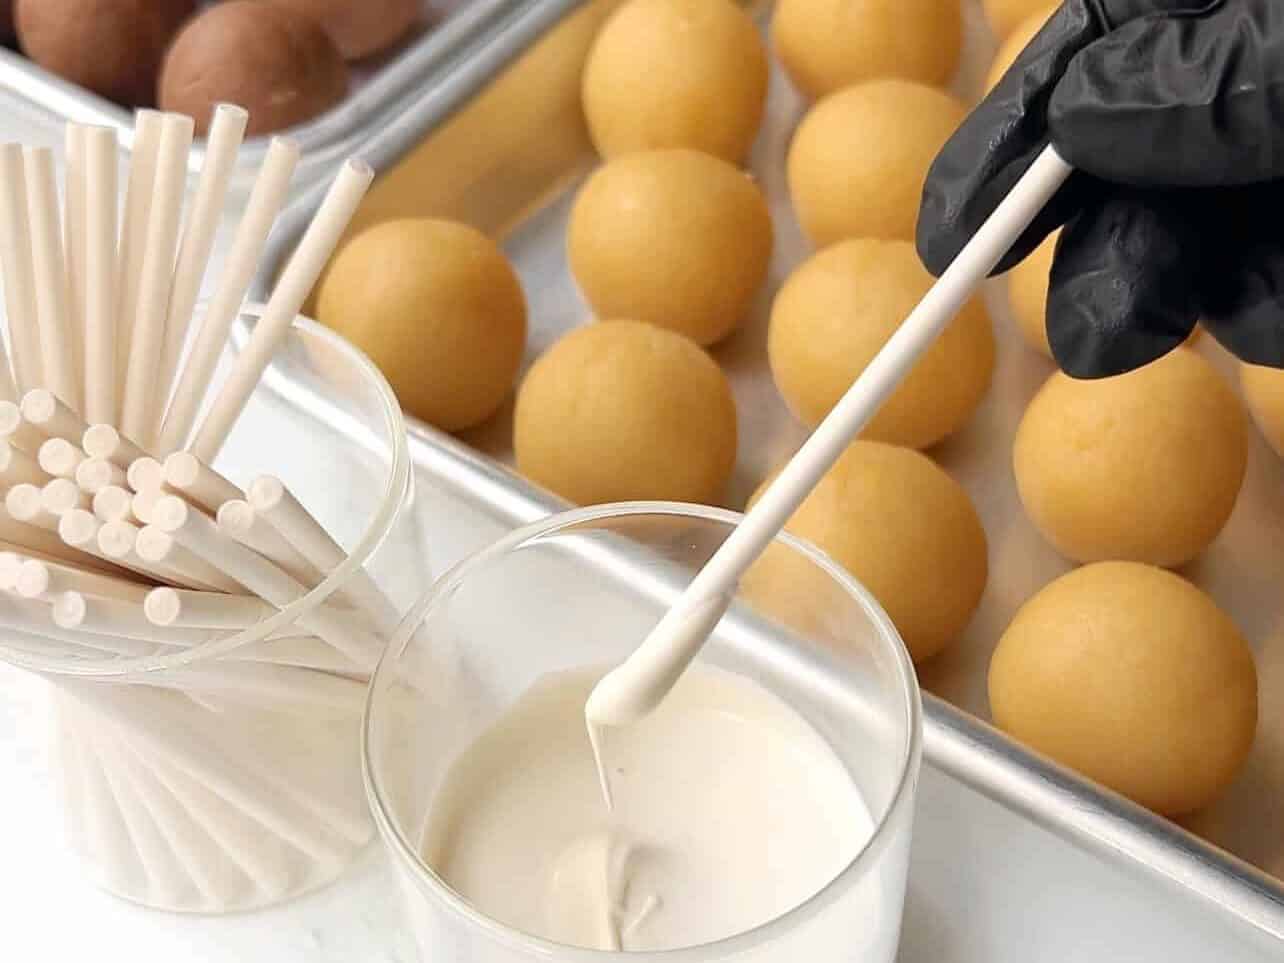
Melt a small amount of candy melts according to package instructions. Dip the tip of cake pop stick into the candy melt.
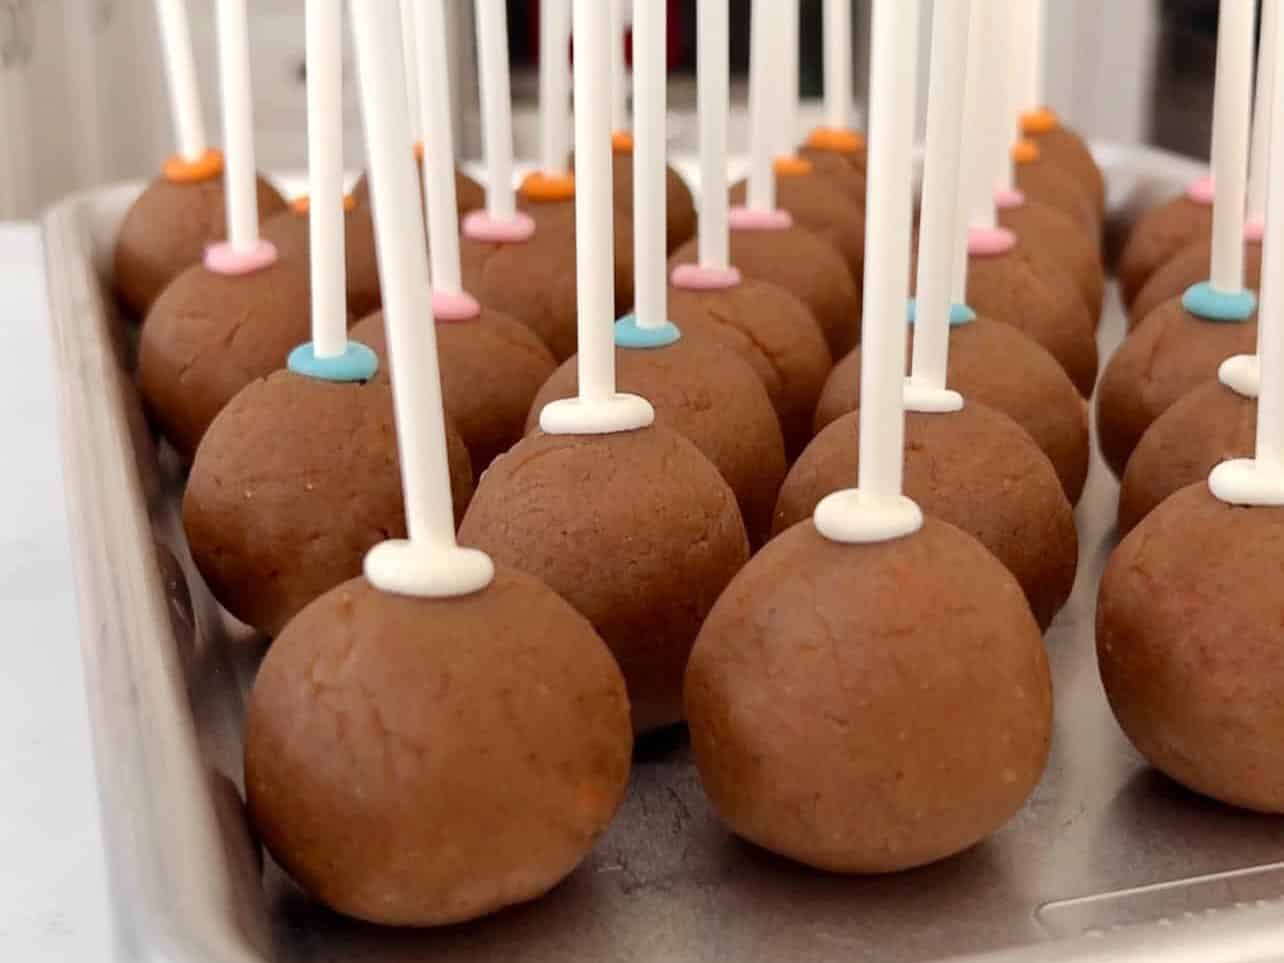
Insert dipped stick halfway through center of the chilled cake pop. Chill in freezer once again for 15 mins. *MOST OVERLOOKED STEP
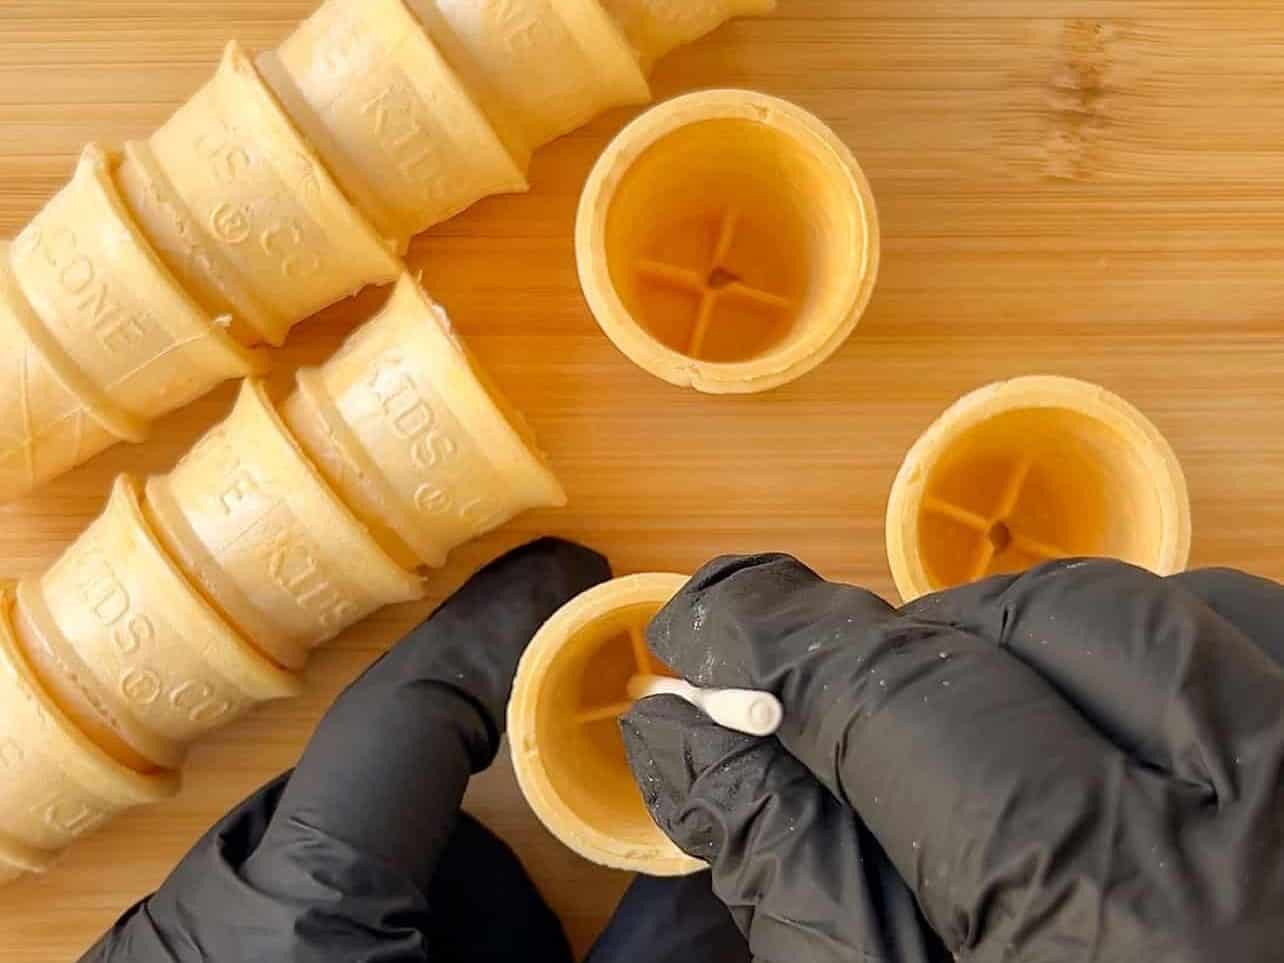
When using mini cones, simply poke a hole through the bottom. If using sugar or Oreo cones, cut down to size. Chop off approx ⅓ of the top and a little off the bottom so you create a hole for the cake pop stick to go through.
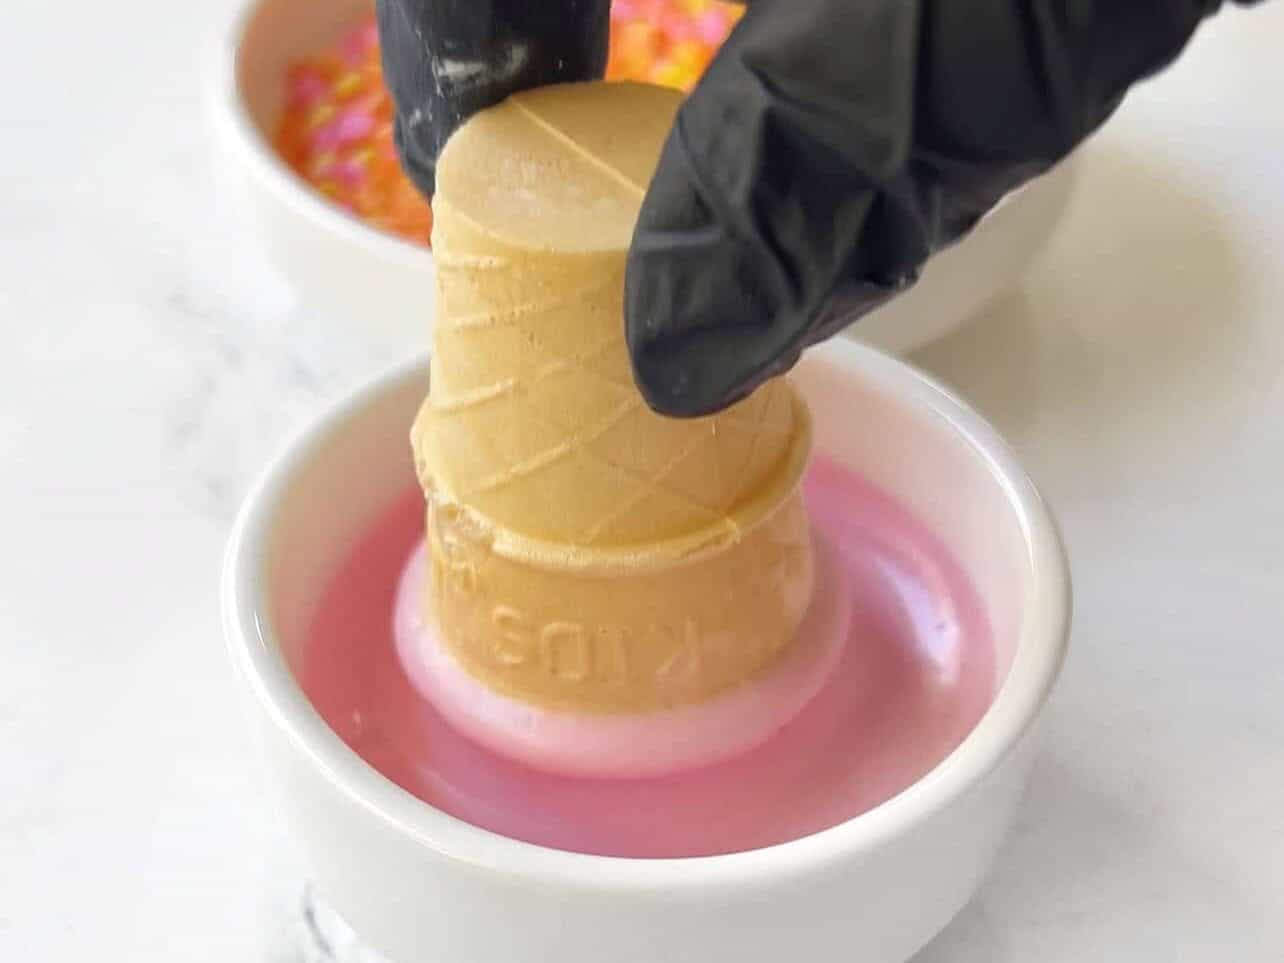
Re-melt candy melts if needed. Dip rim of the cone into the candy melt.
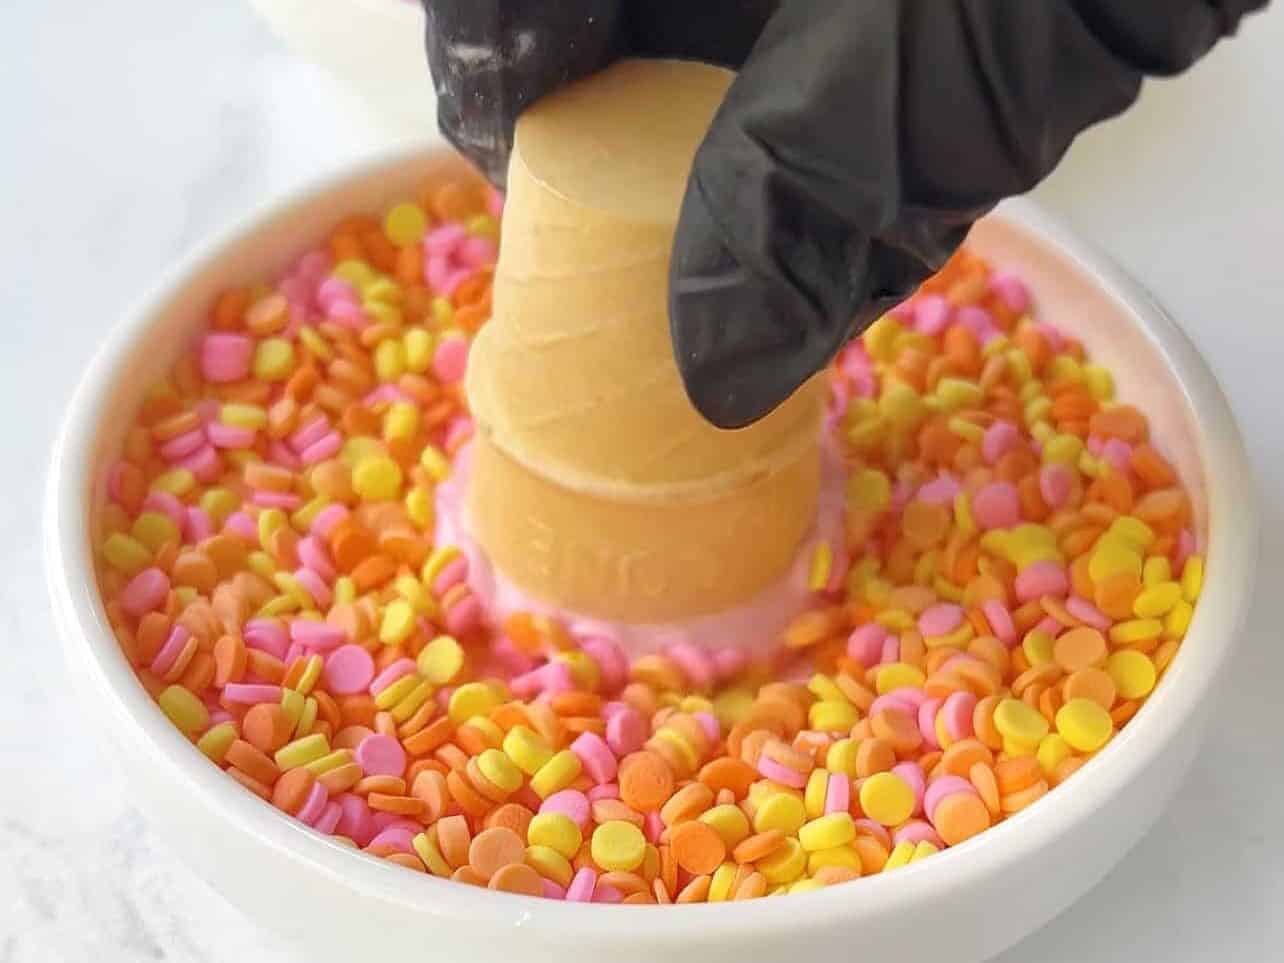
Dip cone rim into your choice of sprinkles or nonpareils.
Allow them to dry as you dip your cake pops.
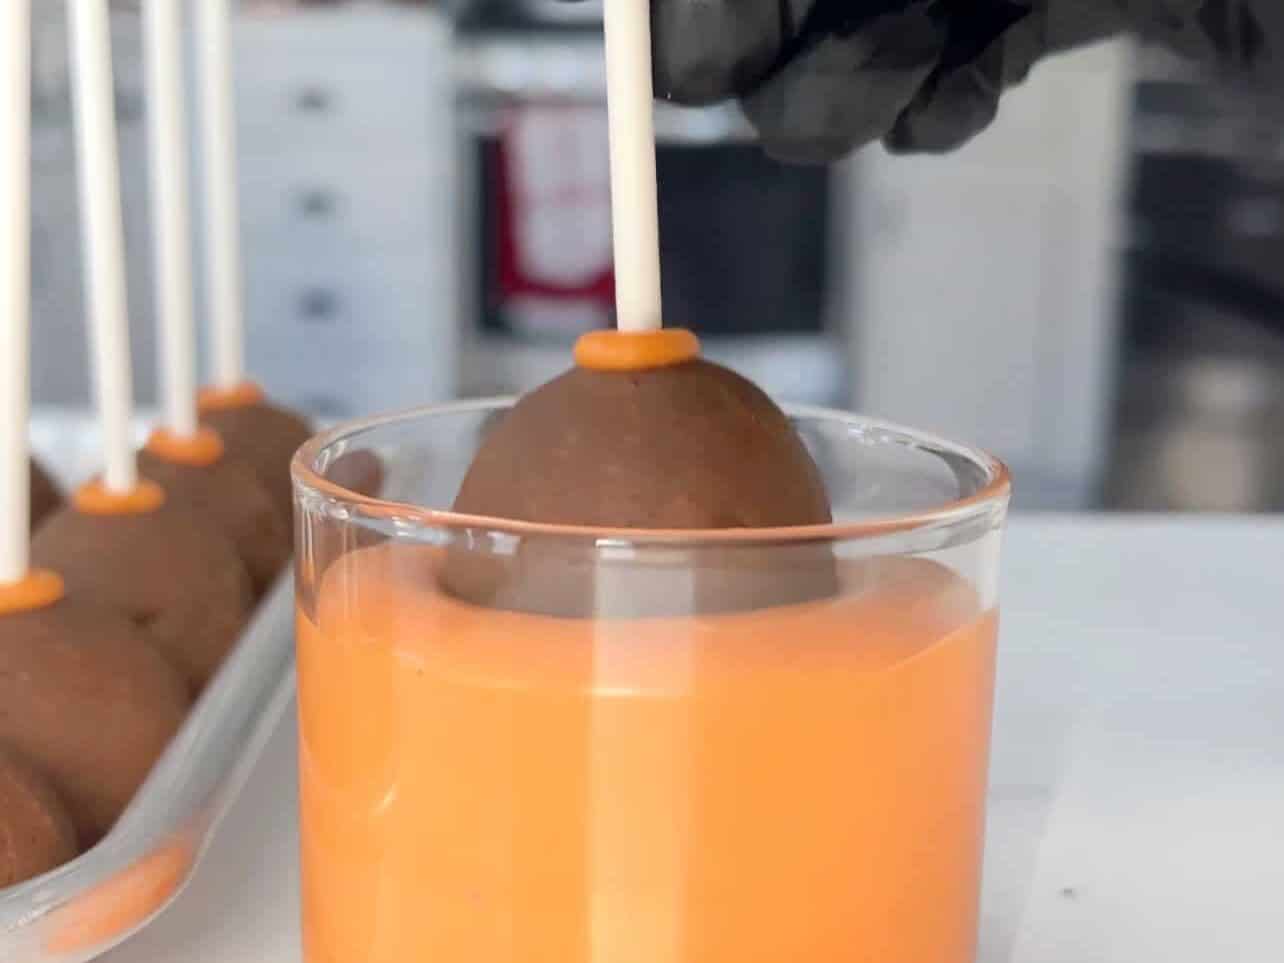
Submerge entire cake pop until it meets the candy melt on the stick. Dunk only once, do not re-dip. We want one even THIN coating.
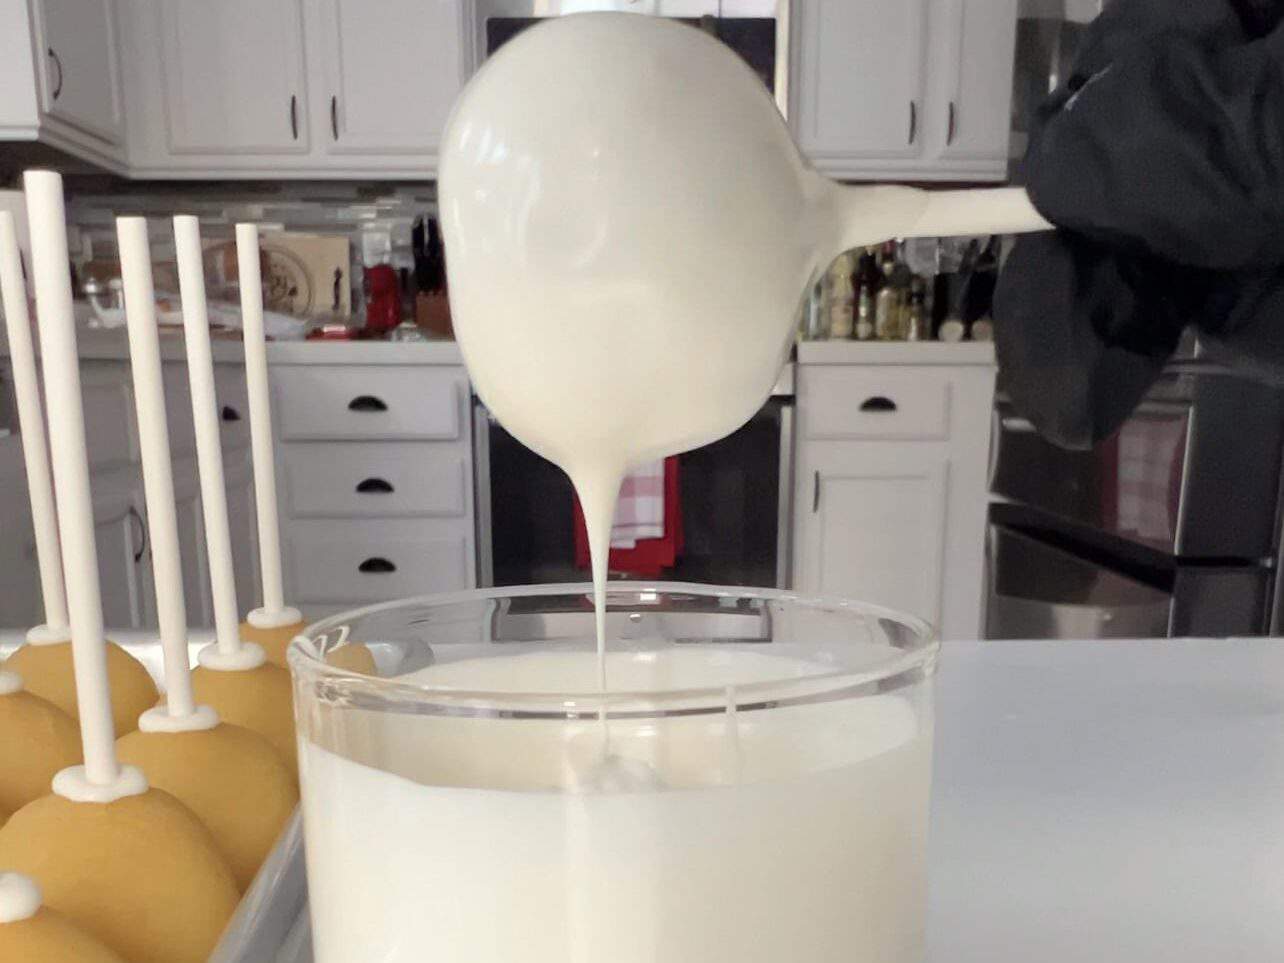
Gently tap the stick with your free hand until all the excess candy melt has dripped off.
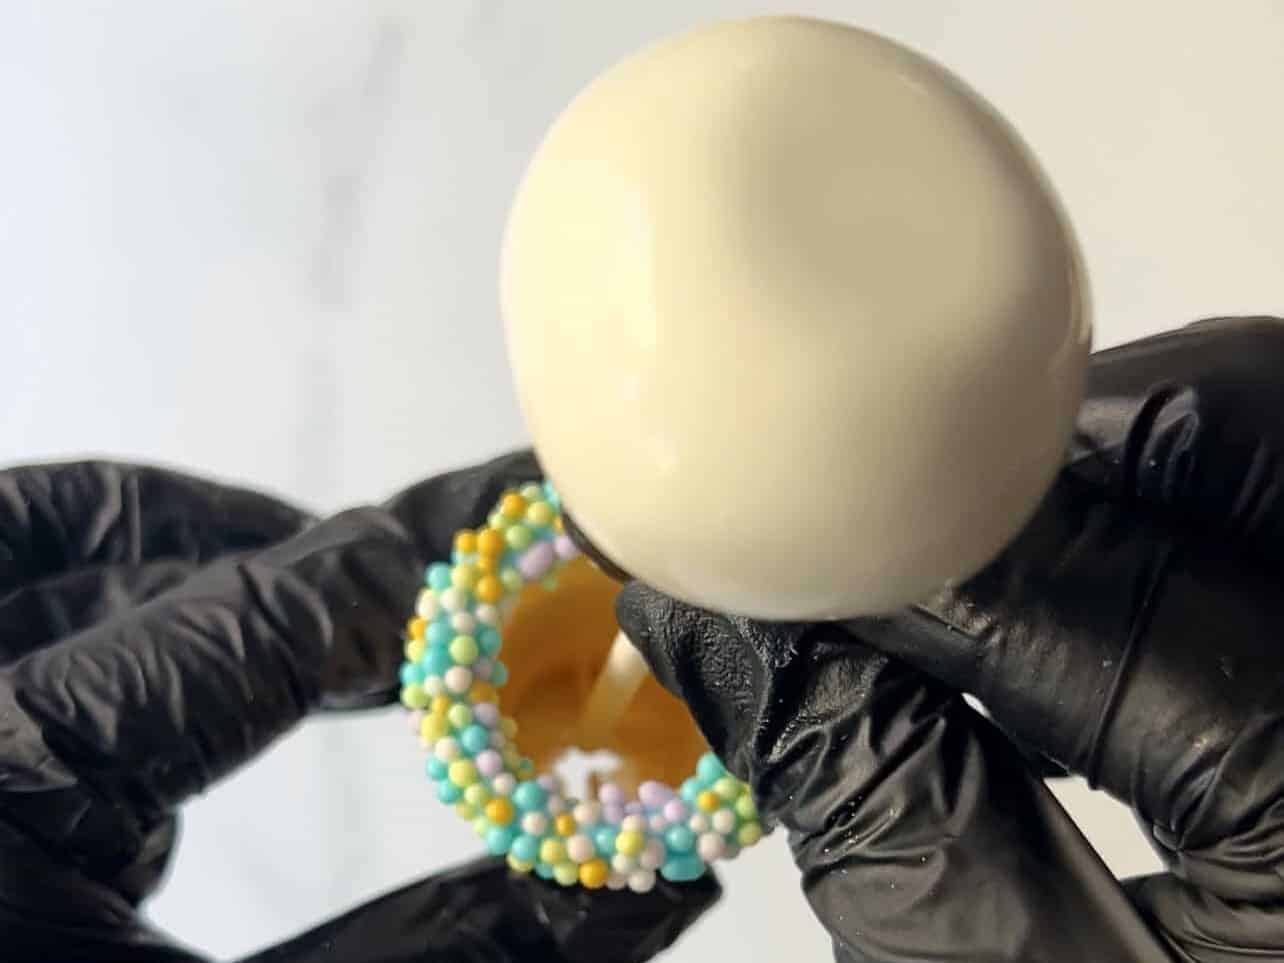
Carefully slide the cake pop stick into your decorated ice cream cone. Hold for a few seconds as the candy melt binds to the sprinkled cone rim.

Use a styrofoam block or any holder to keep cake pop upright until it fully dries.
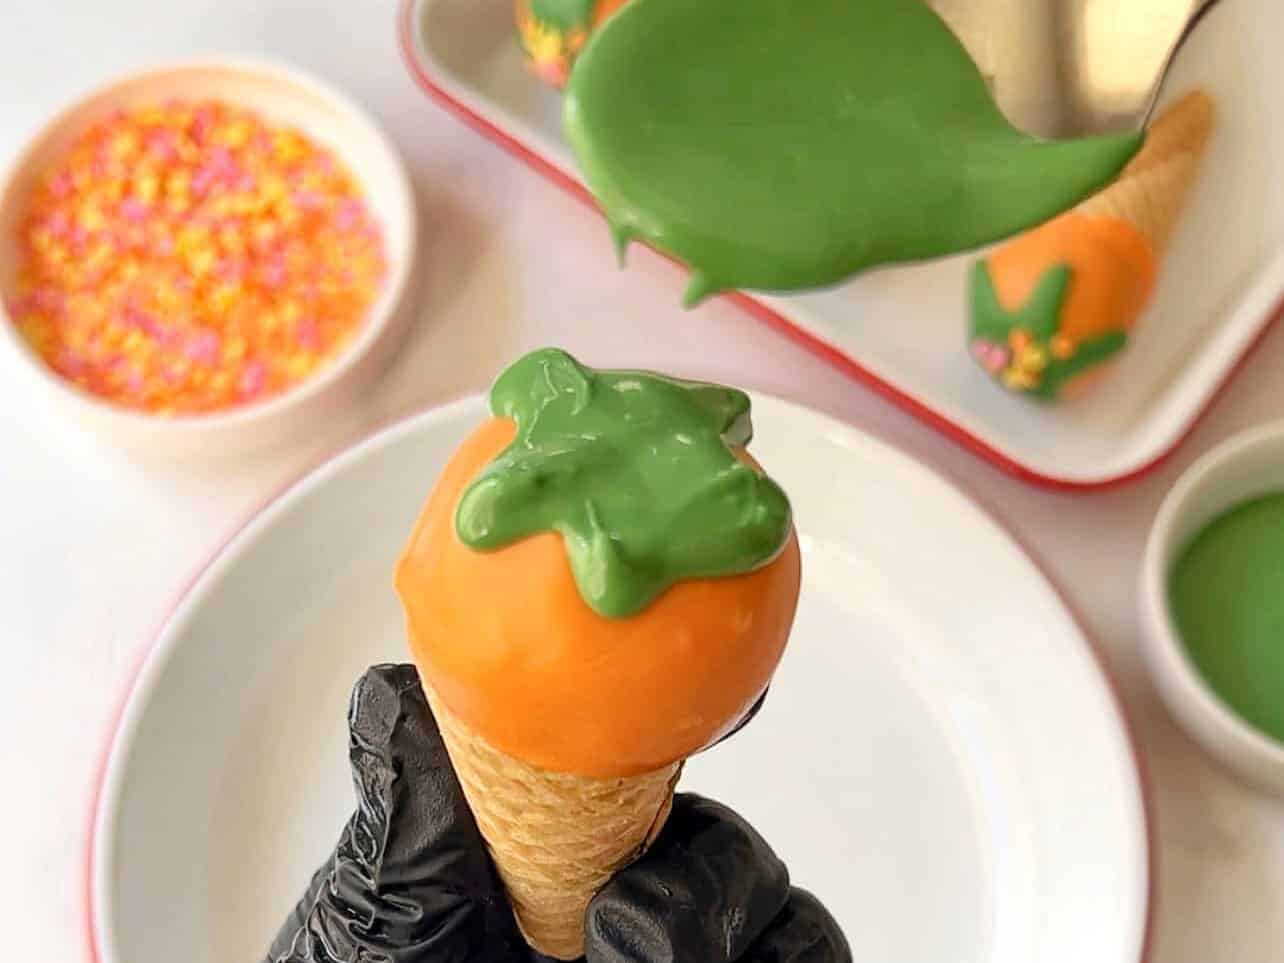
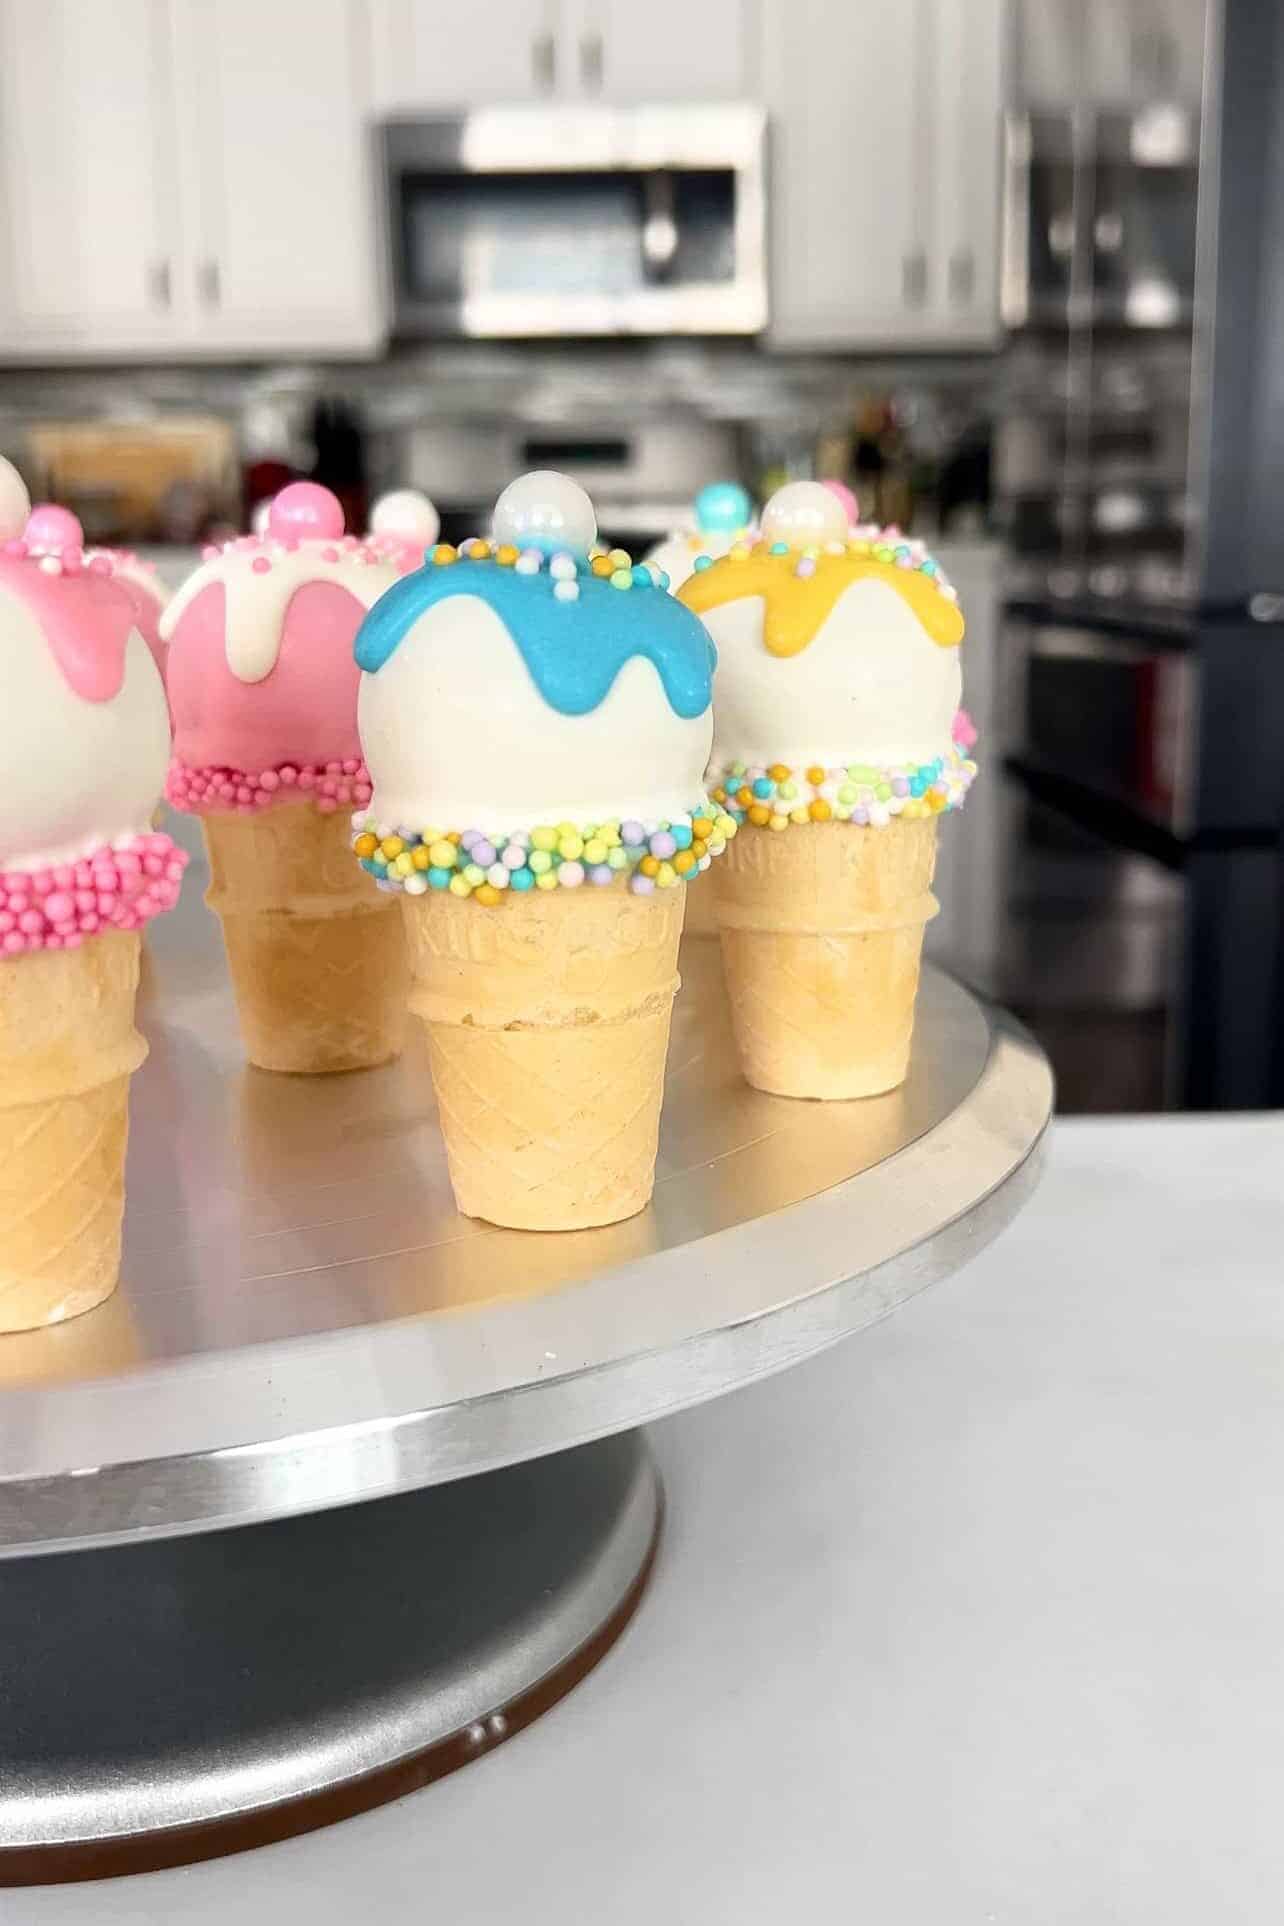
Using a spoon or piping bag, add about ½ teaspoon of candy melt on top of the dried cake pop. Start 5 "ice cream drips" by pushing the candy melts away from the center. Gently shake the cake pop to help the drips move down the cake pop.
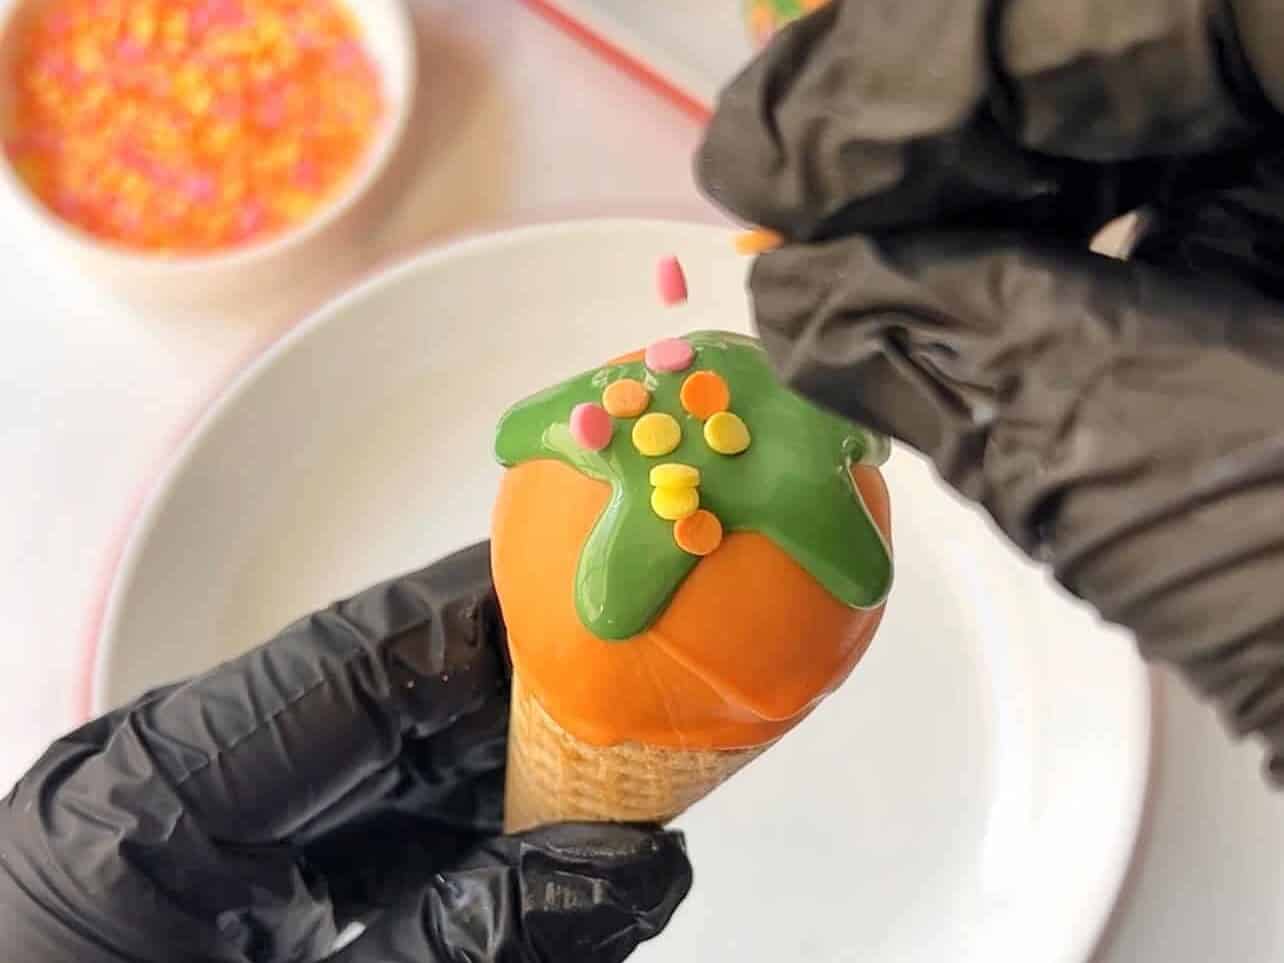
Add any finishing sprinkles or nonpareils before candy melt dries.
Take a bite and enjoy your hard work - you did it!!
Suzy's Tips For Success
- Avoid over-mixing your batter: Mix gently and ONLY until you see no more visible dry flour. If you've ever baked a tough dense cake, it may be due to gluten forming and over-mixing is usually the cause.
- Make it a habit of checking your cake BEFORE bake time is up: You can always bake longer, but you can't go back if you over-bake your cake. It's always a good practice to check ANY bakes a few minutes prior. It is especially important here since over-baking leads to dry cake. Dry cake is more difficult to roll into balls, and you end up with crumbly lumpy cake pops.
- Crumble HOT cake immediately after baking: The steam from the hot cake helps keep crumbled cake soft and moist. If you do not have a mixer and need to crumble the cake by hand, wait for it to cool until it's safe to touch. Although it's best to do it while cake is still hot, if you mix in buttercream into the cake, they should roll fine.
- Skip the sifting: Many people sift powdered sugar to make homemade buttercream. Since we are not using it for cake decoration, sifting is not required. Do not worry if your buttercream has small lumps - t will mix into the cake crumbles seamlessly.
- Avoid rolling LARGE cake pops: One of the biggest problems people face later on during assembly is the cake pop balls not staying attached to the sticks. The simplest way to solve this is to weigh each cake ball using a kitchen scale. Each one should be around 30 grams, or 1¼-inch (3cm) in diameter.
- Melting and re-melting candy melts: Melt a small amount to dip tips of the sticks. Melt the rest when submerging the entire cake pop. Follow the package melting instructions. I find using a glass bowl or cup deep enough to submerge the full cake pop ball with the microwave works best. You want your coating to be a fairly thin consistency.
- Insert dipped lollipop sticks HALFWAY into the cake pop: If you insert the stick too far, the cake pop will fall apart. If not enough, it won't stay attached to the stick.
- CHILL, CHILL, CHILL: This is the step you DO NOT SKIP. Chill cake pops in freezer after rolling into balls. This allows the cake to bind together. Chill them AGAIN after attaching dipped sticks. The candy melt on the tip of the stick will set and act as an adhesive to keep them together. Skipping this step is the most common reason why cake pops do not stay attached to the sticks.
- Prepare your ice cream cones while your cake pops chill: If you're using classic mini cones, simply poke a hole through the bottom. If using sugar or Oreo cones, cut down to size. Chop off approx ⅓ of the top and a little off the bottom so you create a hole for the cake pop stick to go through. To decorate, dip classic cone rims into a small bowl of melted candy melt, then again in a separate bowl of sprinkles. Shake off any excess and allow to dry.
- To avoid cake pops from cracking: Once you've chilled the cake pops, transfer them to the counter for 10 minutes BEFORE dipping in the warm candy melt. Cracks usually happen when different temperatures play a tug of war. So when cake pops are too cold and/or the melted candy melt is too warm, cracks may appear. To prevent this, bring the cake pops closer to room temperature and melt the candy melts in short increments according to package instructions.
- Dunk cake pop only ONCE and allow excess candy melt to drip off: Submerge the entire cake pop ball once until it meets the set candy melt and stick. The goal is to apply only one coating of candy melt as best as you can. Dunking your cake pop more than once will create a heavier candy coating, which may result in cake pop falling off the stick due to its weight. Be sure to tap the stick for a few minutes after dipping with your free hand to allow all the excess candy melt to drip off.
- Alternative to using styrofoam: You'll need something to hold your cake pops upright as their coating dries. Although a block of styrofoam works great, a great alternative I recently learned is simply using a deep loaf pan filled with rice or beans. You can also poke holes using an empty cardboard box.
- Using a spoon for the "ice cream drip": You can certainly use a piping bag when drawing your decorative "ice cream drip" on top your cake pop. However, I have found that candy melt will harden FAST in a piping bag. I found that re-melting candy melt in a small bowl and using a spoon is the most effective for me. Remember to add your last sprinkles quickly, too!
Best Way To Store Ice Cream Cake Pops
You can keep cake pops at room temperature in a cool dry place for 2 days. If not consumed, you can store in the fridge individually wrapped or in an airtight container for 2 weeks, or up to 3 months in the freezer.
FAQ
You can certainly use a hand mixer to crumble your hot cake. If you can only do it by hand, simply wait until the cake is safe to touch and crumble with clean hands. Just be sure to add buttercream to help bind the cake, or your crumbles may roll lumpy.
My favorite brand I use are Sweet Tooth Fairy Meltables, and I find them at my local Michael's Arts & Crafts store. They melts easily into a thin smooth consistency and I love the color selections. I have used a few other brands, but find that some have a grainy texture. You will definitely find candy melts at Walmart, Target, definitely Amazon.
Most likely the cake was over-baked. Be sure to set a timer and check your cake 5 minutes BEFORE your bake time is done. Also be sure to add frosting (buttercream) in help bind your cake crumbles.
Cracks happen when different temperatures play a tug of war. Your cake pops become cold while chilling, then it dries/sets your melted candy melt too quickly. To prevent this, simply bring the cake pops to room temperature about 10 minutes before coating them. Melt the candy melts in short increments according to package instructions and stir consistently. You do NOT want to dip your cake pops in extremely hot candy melt.
The best solution is to make sure you do not roll your cake pops too big. 30 grams or 1¼-inch (3cm) in diameter or smaller is perfect. Don't forget to CHILL your cake pops at every stage - once after rolling ball and again after inserting your dipped stick. If you skip these steps, the candy melt does not have time to set and act as the glue. And finally, do not dip your cake pop into your candy melt more than once. This will create a heavy coating and adds weight to your cake pop. Dip once and shake off the excess candy melt gently.
A great hack I just learned is using a deep loaf pan filled with rice or beans. Simply stick the stick into it and your cake pops will stay upright. You can also poke holes using an empty cardboard box.
Nope! You can turn the sticks gently to detach them from the cake pop and remove them if you wish. I find when using sugar or Oreo cones, you may prefer to leave them on. The classic cones can stay upright on their own.
You Might Also Like...


Equipment
- stand or handheld mixer optional
- large mixing bowl
- small mixing bowls
- cake pan
- parchment paper & nonstick spray
- cake pop sticks 4 or 6-inch
- whisk/rubber spatula
Ingredients
Cake
- 1-13.25 oz store-bought carrot cake mix *refer to Notes for different flavors
- ⅓ cup neutral oil avocado, vegetable, grapeseed, canola
- 1 cup milk (or water)
- 4 large eggs
Cream Cheese Frosting (Buttercream)
- 4 oz cream cheese room temperature
- 2 tablespoon unsalted butter softened
- 1 cup powdered sugar
- ½ teaspoon vanilla extract
- pinch salt
- 1 teaspoon milk add more if needed
Ice Cream Cones
- 30-34 ice cream cones classic, sugar, Oreo
Coating/Decorations
- 16 oz candy melts
- Sprinkles/nonpareils
Instructions
- Preheat oven to 325-350℉ (162-175℃). Refer to the recipe on cake box for exact temperature depending on your baking pan size.
- Combine all cake ingredients in a large bowl. Pour batter into greased/lined pan and transfer into oven. Stick a toothpick in the center of cake to see if it comes out clean 5 minutes PRIOR to the end of bake time. DO NOT OVER-BAKE.1-13.25 oz store-bought carrot cake mix , ⅓ cup neutral oil, 1 cup milk (or water), 4 large eggs
- Transfer baked cake into a large stand mixing bowl while it's still hot. Crumble cake on low speed using a paddle attachment until no large pieces remain. You can also use a handheld mixer or crumble slightly-cooled cake by hand.
- In a small mixing bowl, combine all buttercream ingredients together. Stir well until fairly smooth - small lumps is common. Add all the buttercream to the crumbled cake and mix until fully incorporated.4 oz cream cheese , 2 tablespoon unsalted butter , 1 cup powdered sugar, ½ teaspoon vanilla extract, pinch salt, 1 teaspoon milk
- Roll cake pops 30 g each or approx 1¼-inch (3cm) in diameter. Chill cake pops in freezer for 15 mins, then bring them back to room temperature for 10 mins before coating.
- Melt a small amount of candy melts in microwave according to package instructions. Heat in 15-30 sec increments until thin and smooth. Dip tip of cake pop stick into candy melt, then gently insert dipped tip into the cake balls halfway in. Repeat to all cake balls, then chill again in freezer for 15 mins.16 oz candy melts
- Prepare your ice cream cones. If you're using classic mini cones, simply poke a hole through the bottom. If using sugar or Oreo cones, cut down to size. Chop off approx ⅓ of the top and a little off the bottom so you create a hole for the cake pop stick to go through. To decorate, dip classic cone rims into a small bowl of melted candy melt, then again in a separate bowl of sprinkles. Shake off any excess and allow to dry.30-34 ice cream cones, Sprinkles/nonpareils
- Take cake pops out of the freezer and bring them back to room temperature for 10 mins. This will prevent cracks from forming later. Melt the remaining candy melts until it's back to a thin consistency. Dip cake pop into melted candy melt, making sure it's submerged all the way to the stick. This will help adhere the cake pop and prevent it from falling off the stick.
- Holding the stick with one hand, use your free hand to gently tap cake pop until all the excess candy melt has dripped off. You want to achieve one even coating. Do not dunk again, as this extra weight may cause your cake pop to detach from the stick.
- Gently insert your dipped cake pop into the ice cream cone. Hold together for a few seconds as the candy melt coating adheres to the cone rim. Then place the cake pop stick into a styrofoam block to keep them upright as it dries. Repeat until all cake pops are dipped.
- To apply your "ice cream drip," reheat your remaining or any decorative candy melt. Once the cake pop coating is dry, use a spoon or piping bag to add about ½ teaspoon of candy melt on top of the cake pop. Start 5 "drips" by pushing the candy melts away from the center. Gently shake the cake pop to help the drips move down the cake pop. Add any finishing sprinkles, then return to the styrofoam until it's fully dried.
Notes
Nutrition
Looking for other recipes like this?

Darlene Williams says
What thorough and easy directions! I cannot wait to make some.
Suzy says
Thank you so much, Darlene! I'm super proud of this recipe, so it means a lot you read through it. Please keep me posted when you do!
Nuna says
Love this!!!
Can these be made ahead of time?
Suzy says
Yes! Cake pops freeze or fridge great in an airtight container or bag.